
Users & Teams
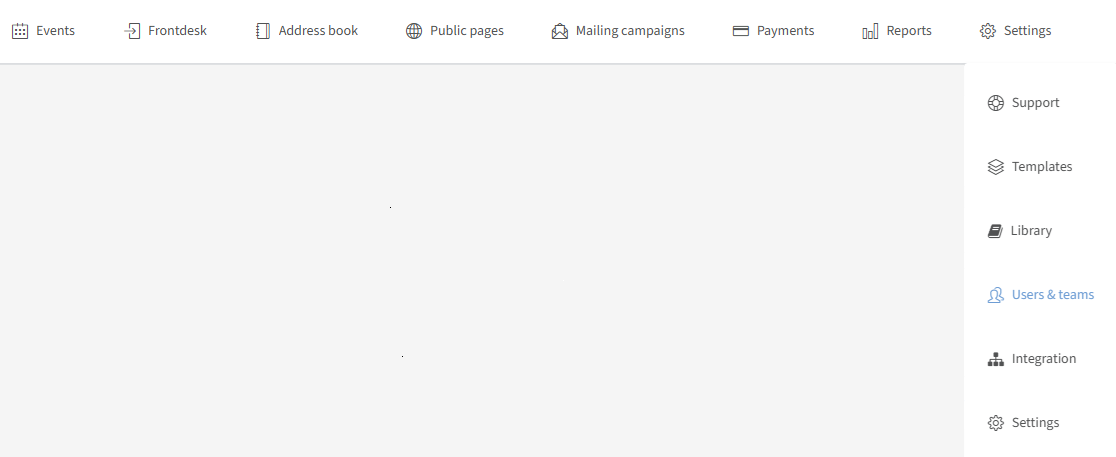
Add users or teams and determine their profile rights. Users are everyone that needs access to the InviteDesk platform or the mobile application — in general, the people that need to manage the events or invite people. You can find Users & Teams in the dropdown menu of the "Settings" tab on the top bar:
On this page:
Users
Overview & actions

Filters
Filter on active/inactive users: filter on users that are active or inactive.
Actions
Search for users / teams: in this free text field, you can search for a user or a team the user is linked to, by typing for example a part of the user's name or the team's name.
Sorting columns: by clicking a column you can apply sorting for that specific column.
On the right-hand side of the users section, you will see the following icons:

View activities: by clicking the clock icon, you can view the activities of users in the system. Only visible for admin users — contact InviteDesk for more details.
Import new users: use an Excel file to import your users (see "Import new users" below).
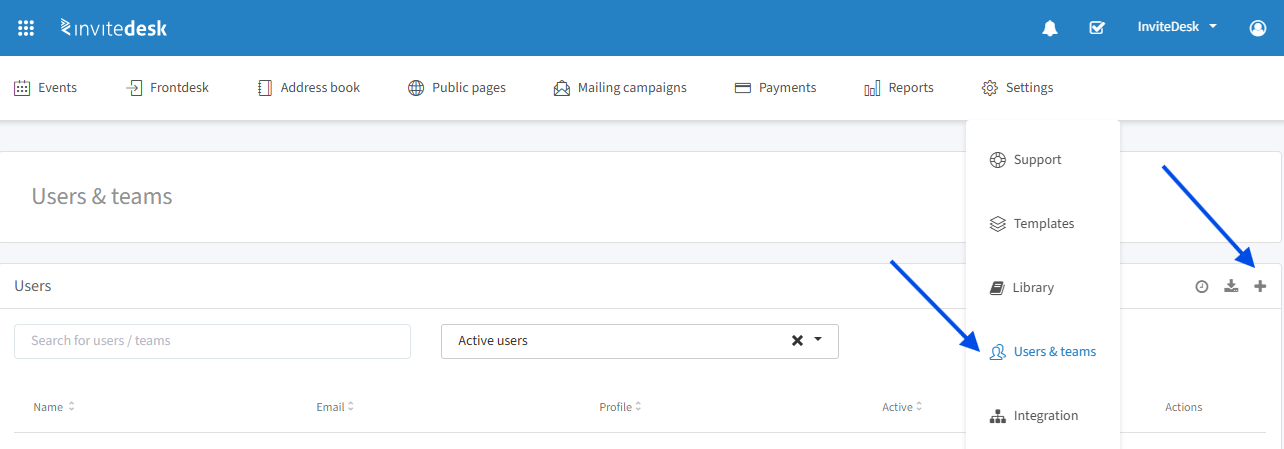
Add new user: click the "+" icon to add a new user (see "Add new user" below).
On the right-hand side of your users, you will see the following icons:

Edit user: by clicking the pencil icon, you can edit this user.
(Re)send invitation: by clicking the envelope icon, you can (re)send the activation mail to this user. This icon will only be there if the user hasn't activated his account. An activation mail is valid for 48 hours. If the user has already activated the account, you will be able to deactivate the user — the user will then be in the "Inactive users".
Remove user: by clicking the trashcan icon, you can remove the user completely. Only possible when a user hasn't activated his account yet or when the user is in the inactive users section.
Tip: If you want to remove access for a specific user, you can simply deactivate that user. Then, if necessary, you can find that user again (filter on inactive users) and set it back to active, if there are enough user licenses available. This way, the user will not lose his or her password and you keep the history of this user.
Add new user
By clicking on the "+" sign on the right-hand side of the "Users" section, you can add a new user.
You will see the following:
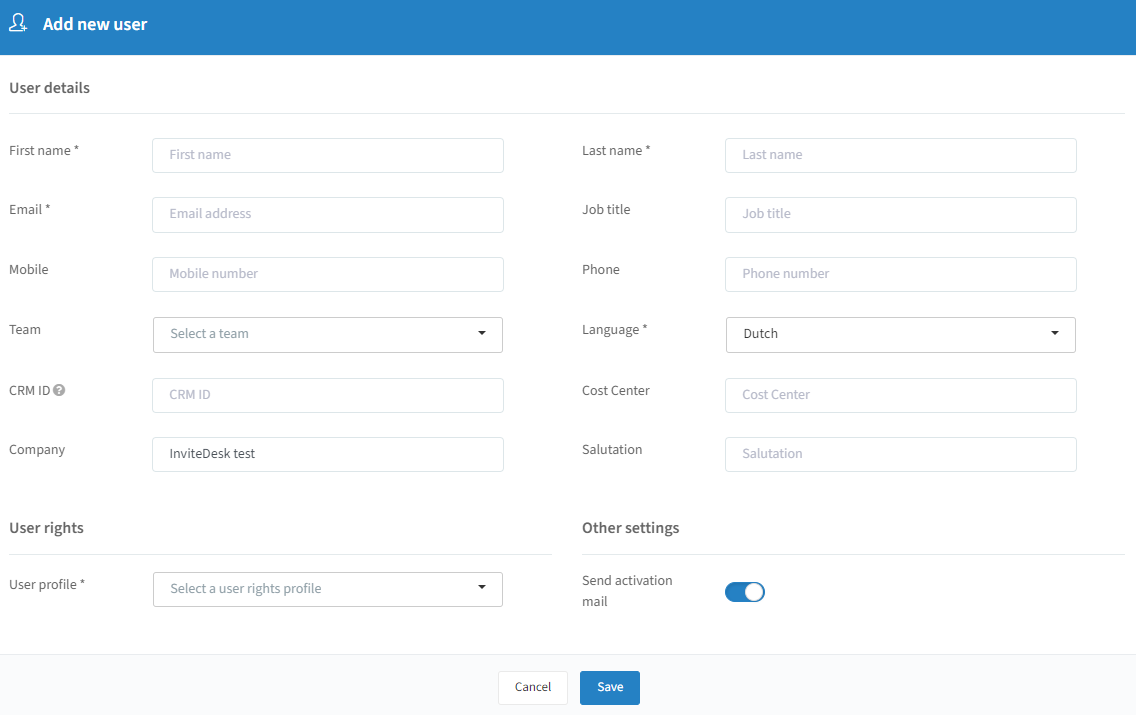
Fill in the details with as a bare minimum the mandatory fields marked with *.
You can link this user to a specific team if needed (see "Add a new team" below).
You can select a specific user rights profile for this user (see "Create a new user right profile" below).
When you filled in the necessary data, you will also have the option to activate or deactivate the slider "Send activation mail". If you deactivate this slider and save your changes, you can send the activation mail at a later time. That way you can already start adding users, and using them for example as Ticketholders for a certain event, but you will have to send the activation mail at a different time. Don't forget to come back and click on the envelope icon for this specific user, to send the activation mail if needed.
When you have done the steps above, click "Save" at the bottom. This new user will now be added to your users.
Import new users
By clicking on the icon below, on the right-hand side of the "Users" section, you can import new users to InviteDesk by using an Excel file.

The system will take you through an easy-to-understand wizard:
Upload:
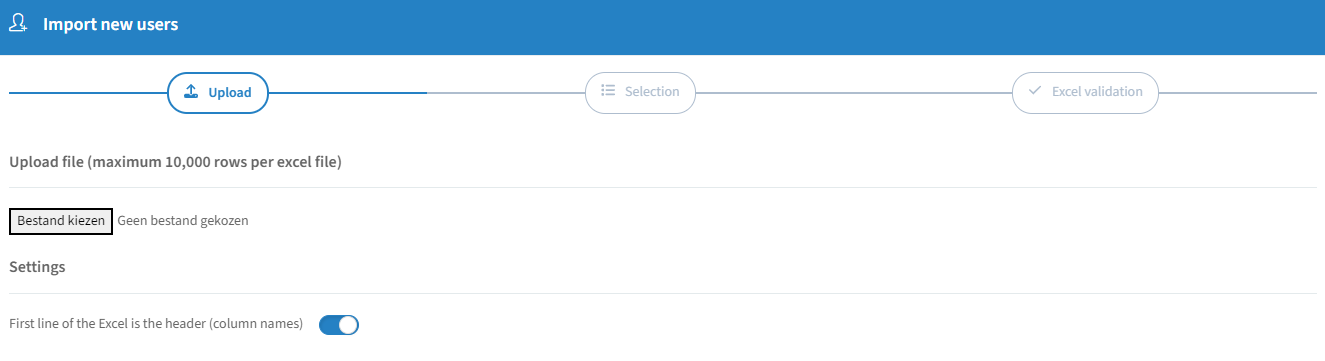
Choose your file (Maximum of 10.000 rows for each Excel file) and determine if the first line of your Excel file is just data or the title of your column names.
Selection:
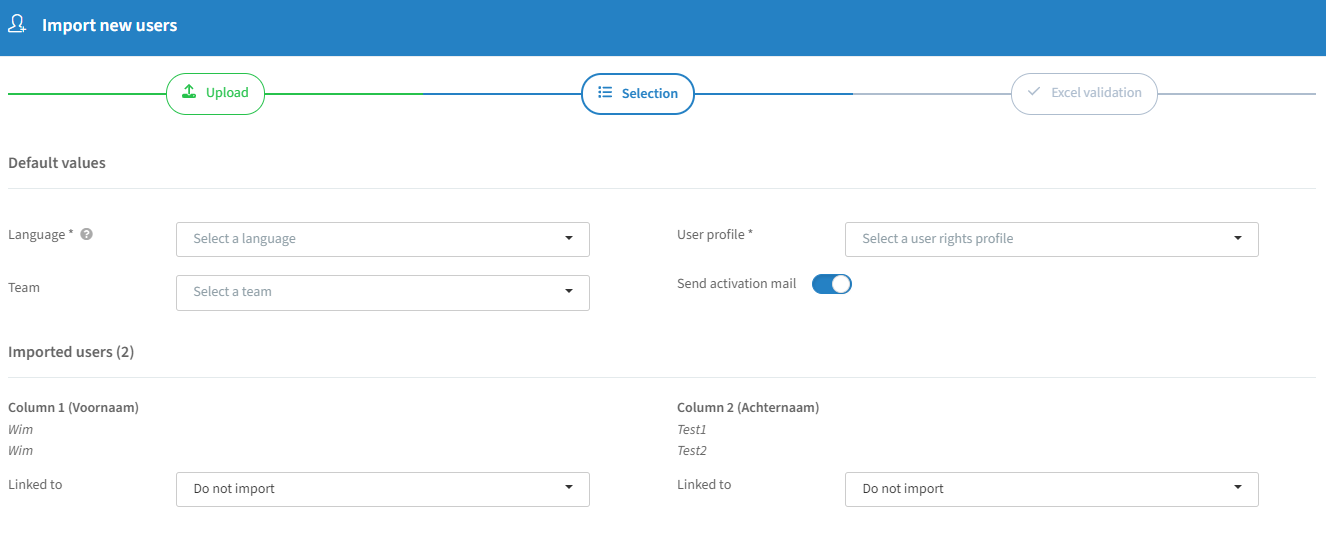
Language: select the default language for your users, in case this value is not present in your Excel file as a separate column.
User profile: select the specific user rights profile for these users (see "Create a new user right profile" below).
Team: you can optionally select the team that these users will be linked to (see "Add a new team" below).
Send activation mail: you can activate or deactivate this slider. If you deactivate it, you can send the activation mail at a later time — that way you can already start adding users, and using them for example as Ticketholders for a certain event. Don't forget to come back and click on the envelope icon for these users, to send the activation mail if needed.
Imported users: identify data of your Excel file. Here you determine the data of your columns and map it with the appropriate data field. The first name, last name and mail of your users are mandatory. You can always decide to not import specific columns.
Excel validation:
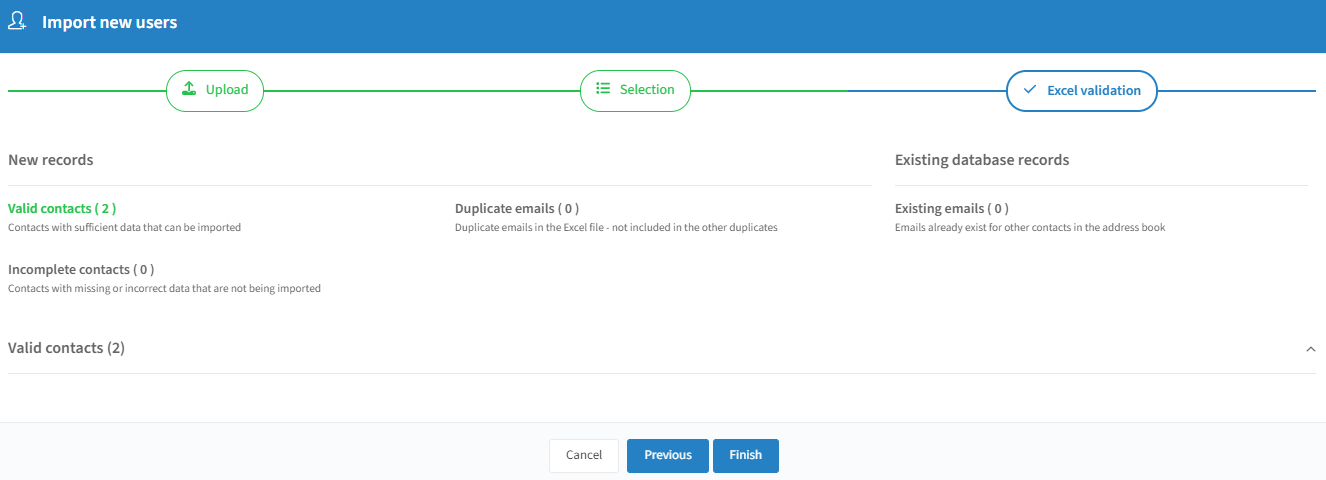
In this step, the wizard will determine how many valid users there are present in the Excel file. We will indicate which emails are duplicates, are existing or contain incomplete data. If this is the case, you will be able to see what is wrong, for example, "E-mail is empty".
When ready, click on "Finish" at the bottom. These users will now be added to your users.
User Rights Profiles
Overview & actions
Actions
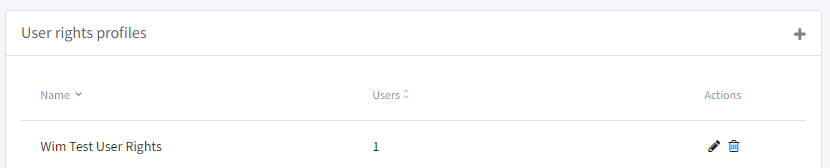
Sorting columns: by clicking a column you can apply sorting for that specific column.
On the right-hand side of the user rights profiles section, you will see the following icon:

Add a new user rights profile: click the "+" icon (see "Create a new user right profile" below).
On the right-hand side of your user rights profiles, you will see the following icons:

Edit a user rights profile: by clicking the pencil icon, you can edit this user rights profile.
Remove a user rights profile: by clicking the trashcan icon, you can remove this user rights profile. Only possible if it is not currently linked to users.
Create a new user right profile
By clicking on the "+" sign on the right-hand side of the "User rights profiles" section, you can add a new user rights profile. You will see the following (you will also get this screen if you want to edit an existing user rights profile):
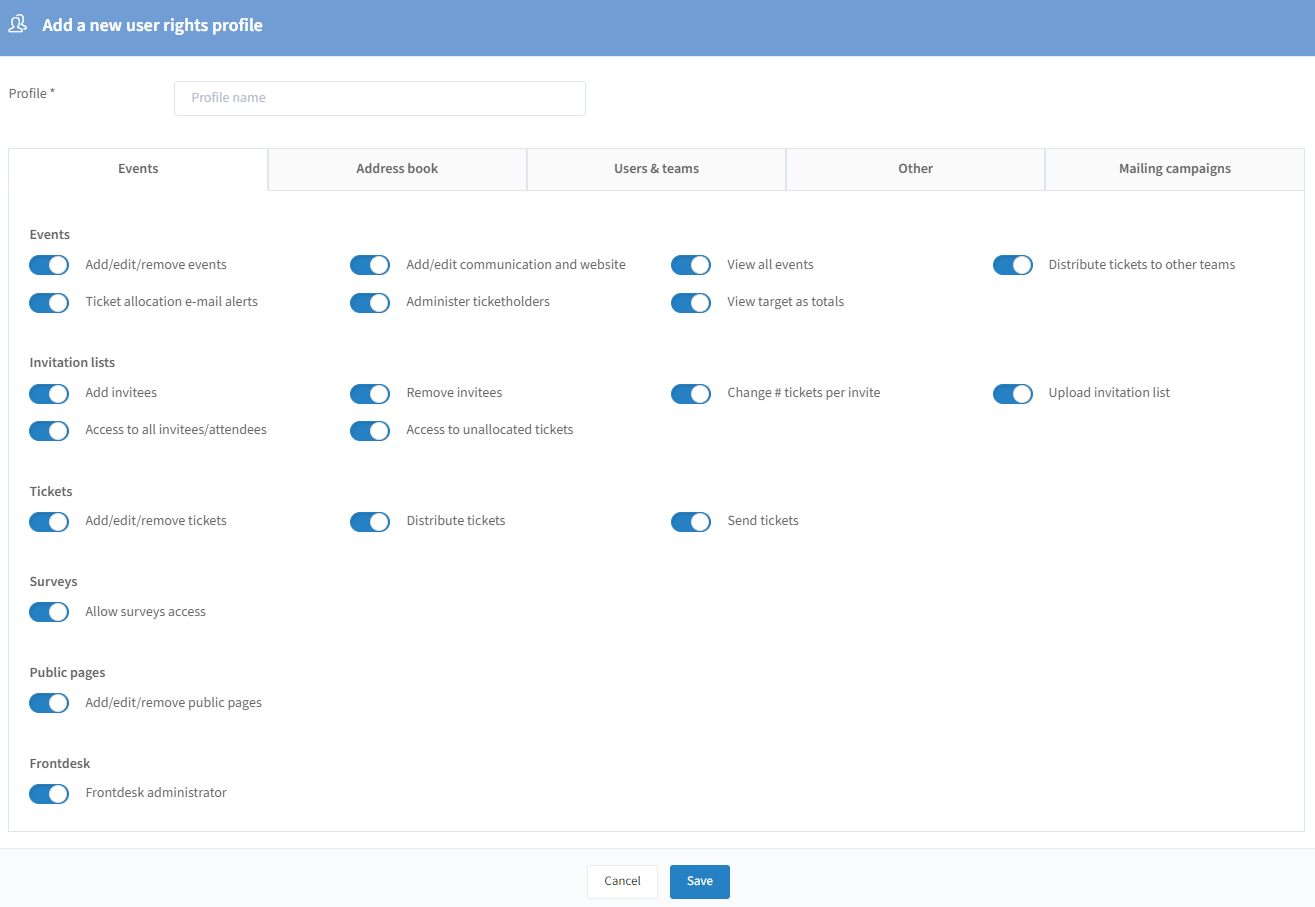
Below is an explanation in detail about all the options:
1. Tab Events
Events:
Add/edit/remove events: when deactivated, the user will not be able to create new events, clone events, edit the event details or delete an event.
Add/edit communication and website: when deactivated, the user will not be able to edit the communication setup of an event, edit/create or delete the registration website, or any other communications in your timeline. The user can only view them but not alter them.
View all events: when deactivated, the user will only see the events where he is the Event Owner or where he, or at least one member of the team he is leading, is a Ticket holder.
Distribute tickets to other teams: when deactivated, the user will only be able to see ticket holders from his own team in the Ticket holders section, and can only change the ticket holder of a contact on the invitation list to someone from his own team (see "Access to all invitees/attendees" for a specific combination). When activated, the user will be able to see the tickets of everyone on the quota list and can redistribute those tickets — however, the user won't see the tickets that are still on Company level "Unallocated".
Ticket allocation e-mail alerts: when deactivated, the user will not receive a notification (e-mail) when they have been added to the Ticket holder section of an event or when they have received ticket quota.
Administer ticketholders: when deactivated, the user won't have access to the general menu of ticket holders of an event. If activated, the user can add users as a ticket holder and determine the quota per ticket holder if needed. If "Distribute tickets to other teams" is deactivated, the user will not be able to add any user outside his team and will only see the users from within his team.
View target as totals*: when deactivated, the user sees the totals of the event, equal to the totals they have as a ticket holder — when logging in as a ticket holder, you immediately see if you still need to distribute tickets and for which events. The totals for registered/waiting/declined are always calculated based on your ticket holder information. When activated, the user sees the totals for registered/waiting/declined based on the invitations the user is allowed to see. The goal or target is now at least that of the user as a ticket holder, possibly increased by the number of tickets that are 'unallocated' — whether the sum includes "unallocated" depends on the "Access to unallocated tickets" right.
*Combinations for "View target as totals" — combination with the right "Access to all invitees/attendees": if activated, the user will see the same as an event owner (you are allowed to see all invitations, so you see the totals just like an event owner or an admin does — this ensures you see the same as an event owner without being one). If deactivated, there is a check whether the user has access to unallocated tickets: if "Access to unallocated tickets" is activated, the target/goal is the sum of unallocated tickets + that of yours as a ticket holder; if deactivated, the target/goal is that of the user's sum as a ticket holder — in that case, the user will only see his own total.
Invitation lists:
A brief summary of what you can see on the invitation list, depending on whether you are the event owner:
If the user is event owner: the user can see all invitees when "Distribute tickets to other teams" is activated or "Access to all invitees/attendees" is activated. The user can see only contacts linked to him as a ticketholder, contacts linked to ticketholders that are part of the team he is leading, and the unallocated contacts, when both rights are deactivated.
If the user is not the event owner: the user can see all invitees when "Distribute tickets to other teams" and "Access to all invitees/attendees" are both activated. The user can see everyone but not the unallocated contacts, when "Distribute tickets to other teams" is activated and "Access to all invitees/attendees" is deactivated. The user can see only contacts linked to him as a ticketholder, contacts linked to ticketholders that are part of the team he is leading, and the unallocated contacts, when "Distribute tickets to other teams" is deactivated and "Access to all invitees/attendees" is activated. If both are deactivated, the user can only see contacts from his InviteDesk team structure and where he is the account owner, but not the unallocated contacts.
Add invitees: when deactivated, the user will not be able to add new invitees to the invitation list of an event.
Remove invitees: when deactivated, the user will not be able to delete invitees from the invitation list.
Change # tickets per invite: when deactivated, the user will not be able to change the number of guests per invite for a contact on the invitation list. When activated, the user can change the number of guests per invitee to a maximum that is set per event by the event administrator.
Upload invitation list: when deactivated, the user won't be able to add new invitees by uploading an invitation list (including HubSpot lists and the like). They will still be able to add themselves, people from the address book or new contacts — if you would also like to disable this, see "Add invitees" above.
Access to all invitees/attendees: when deactivated, the user will only be able to see invitees where he is the Ticket holder or contacts from ticket holders that are members of the team he is leading. If "Access to unallocated tickets" is active, the user will also see the invitees where there is no Ticket holder. If the user is Event owner, and "Distribute tickets to other teams" is activated, the user will still be able to see all invitees/attendees even if this slider is deactivated. Users will also see events when there are contacts on the invitation list where he is listed as the Account Owner, if these contacts are not linked to another Ticket holder on the invitation list.
Access to unallocated tickets: when activated, the user can re-assign a ticket holder to a specific contact. When deactivated, the user will only be able to see invitees where he is the Ticket holder or contacts from his InviteDesk team structure. If the user is Event owner, the user will be able to see the unallocated. Users will also see events when there are contacts on the invitation list where he is listed as the Account Owner, if these contacts are not linked to another Ticket holder on the invitation list.
Tickets:
Add/edit/remove tickets: when deactivated, the user will not be able to create/edit or remove tickets in the Tickets section of an event. This section will be completely invisible for the user.
Distribute tickets: when deactivated, the user will not be able to distribute the tickets from the "Ticket list" of an event. The pencil icon and the print icon will also be invisible for the user.
Send tickets: when deactivated, the user will not be able to send the ticket mail from the "Ticket list" of an event to people who are registered.
Surveys:
Allow surveys access: when deactivated, the user will not see the survey section/survey results of an event, and won't have access to the surveys section in the general menu of InviteDesk.
Public Pages:
Add/edit/remove public pages: when deactivated, the user won't have access to the Public pages section in the general menu of InviteDesk.
Frontdesk:
Frontdesk administrator: when deactivated, the user can't add users to the Frontdesk module because the user will not see the Frontdesk users section of an event. The Frontdesk section in the general menu will still be visible — the user will there only see the events where he is the Event Owner or if the user has been added as a Frontdesk user by someone else for a specific event.
2. Tab Address Book
Add contacts: when deactivated, the user won't be able to add new contacts in the address book — only export contacts. If the user is also not allowed to export contacts, deactivate the slider "Allow report access" under the tab "Other".
Edit contacts: when deactivated, the user won't be able to edit a contact in the address book.
Remove contacts: when deactivated, the user won't be able to disable or delete a contact in the address book.
Access to all contacts: when deactivated, the user will only see the contacts where he is the account owner.
Manage public lists: when deactivated, the user won't be able to edit/deactivate or delete a public list, nor create a new one. The user can still see public lists.
3. Tab Users & Teams
Add/edit/remove teams: when deactivated, the "Teams" section will be invisible for them.
Add/edit/remove profiles: when deactivated, the "User rights profiles" section will be invisible for them.
Add/edit/remove users: when deactivated, the "Users" section will be invisible for them.
If all 3 sliders are deactivated, the user will not see the "Users & teams" section in the menu.
4. Tab Other
Templates:
Add/edit/remove templates: when deactivated, the user will not have access to the "Templates" section.
Reports:
Allow report access: when deactivated, the user will not have access to the "Reports" section. They also won't be able to export the invitation list and attendee list of an event, and won't see the registration details, mail statistics, survey results, interactions and UTM statistics of an event.
View all user exports: when deactivated, the user will only have access to their own exported files in the file center. When activated, the user can access all exported files from all users in the tenant.
Settings:
Edit company settings: when deactivated, the user will not be able to change any of the company-related settings in the "Settings" section.
5. Tab Mailing campaigns
Mailing campaigns:
Add/edit/remove campaigns: when deactivated, the user will not be able to create new mailing campaigns, clone mailing campaigns, edit a mailing campaign or delete a mailing campaign.
View all campaigns: when deactivated, the user will only see the mailing campaigns where he is the Campaign Owner or where he is a personalised sender.
Recipient lists:
Add recipients: when deactivated, the user will not be able to add recipients to the recipient list of a mailing campaign.
Remove recipients: when deactivated, the user will not be able to delete recipients from the recipient list.
Upload recipients: when deactivated, the user won't be able to add new recipients by uploading a recipient list. They will still be able to add themselves, people from the address book or new contacts — if you would also like to disable this, see "Add recipients" above.
Access to all recipients: when deactivated, the user will only be able to see recipients where he is the personalised sender. The user will also see mailing campaigns when there are recipients on the recipient list where he is listed as the Account Owner, if these contacts are not linked to another personalised sender on the recipient list.
When you have done the steps above, click "Save" at the bottom. This new user rights profile will now be added to your user rights profiles section.
Teams
Overview & actions
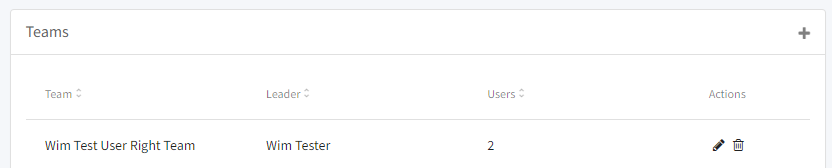
Actions
Sorting columns: by clicking a column you can apply sorting for that specific column.
On the right-hand side of the teams section, you will see the following icon:

Add a new team: click the "+" icon (see "Add a new team" below).
On the right-hand side of your teams, you will see the following icons:

Edit a team: by clicking the pencil icon, you can edit this team.
Remove team: by clicking the trashcan icon, you can remove this team. Only possible if it has 0 members.
Add a new team
By clicking on the "+" sign on the right-hand side of the "Teams" section, you can add a new team. You will see the following (you will also get this screen if you want to edit an existing team):
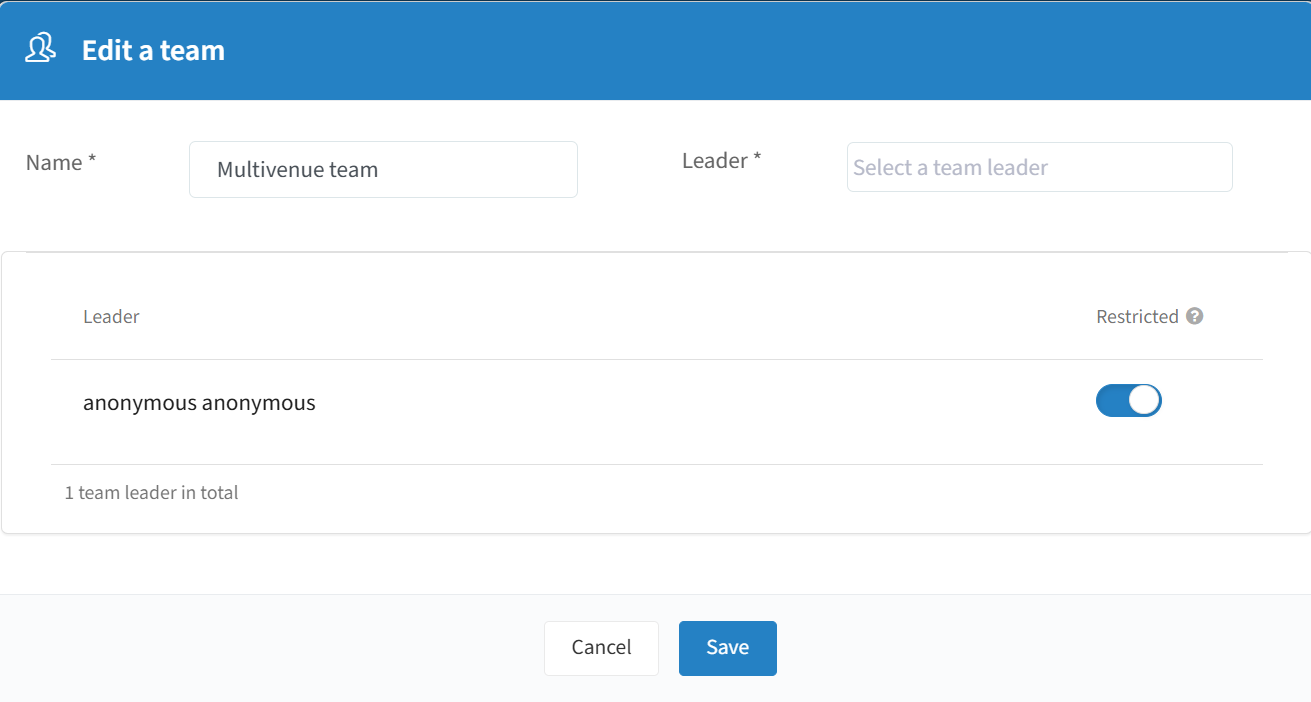
Name: give your team a name.
Leader: choose an InviteDesk user to be selected as team leader.
Restricted: when this is enabled, team leaders can only see the contacts of members within their own team.
Unrestricted: when the slider is disabled, they can also see contacts from other teams in which members of their team are leaders.
When you have done the steps above, click "Save" at the bottom. This new team will now be added to your teams section. You can now add users to a specific team if needed (see "Add new user" above).