
Tips & Videos
A few helpful tips & FAQ's with video tutorials.
On this page:
Tips
Add dynamic content to your emails (paid feature)
With the usage of dynamic content, you can easily target specific segments/venues in our different emails. For example the confirmation mail: you only need to make 1, but you add different content blocks in which you define which content should be visible to specific segments/venues. And this is applicable to all our emails (see "Mails overview" on the Event communication page).
Creating a segment
First of all, we will talk about how you can create a specific segment on the invitation or attendee list. You can do this by clicking on the icon below:

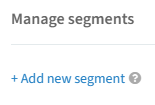
You will then have the option to create a segment by clicking on "Add new segment":
Linking segments
When you have created your segments, you can start to add your invitees. If you add them from the address book, you can link your invitees to a chosen segment. See an example below:

If you add them by importing an Excel file, you will have the following option in the "Default values":
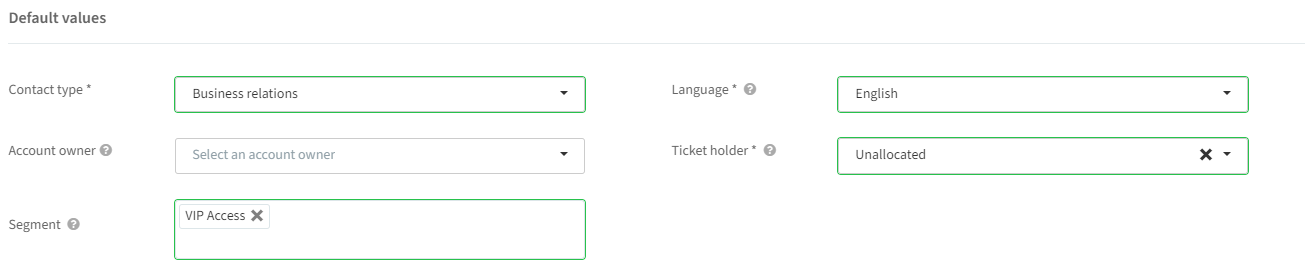
Please note that all invitees will be added to this segment when using the default value segment section. You will need to upload a list per segment.
Tip: it's best to create the segments and link them to your invitees before you send out the invitation. As soon as an invitee is "Confirmed", you will need to edit the invitee manually to link them to a specific segment. When linking your segments by adding your invitees from the address book or by importing an Excel file, the segmentation is always linked to the main invitee.
Edit segment members
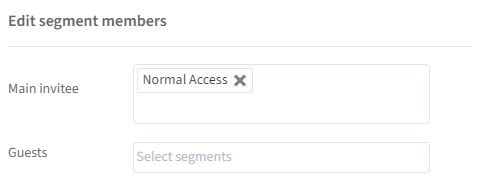
If you click on the pencil icon of a contact on the invitation or attendee list, you can also manually edit the segment members:
Add dynamic content to your emails
When you have the dynamic content active on your account, you can start to create emails with dynamic content. The usage will be the same across all the emails. Let us give an example by showing the confirmation mail. You will see the following option when creating your email:
After clicking on the above, you can for example make a content block like this:
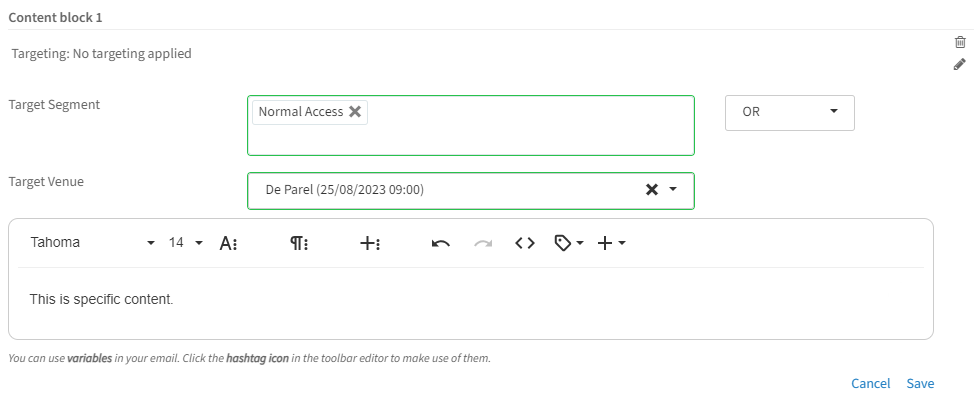
Target Segment: choose which segment(s) will receive this content. The "OR" or "AND" filter applies to the segment selection.
Target Venue: choose which venue will receive this content. If you only have 1 venue for your event, this option will not be visible.
Content: add your content in the editor.
By clicking on "Save", you will save your content block and you will see the following:
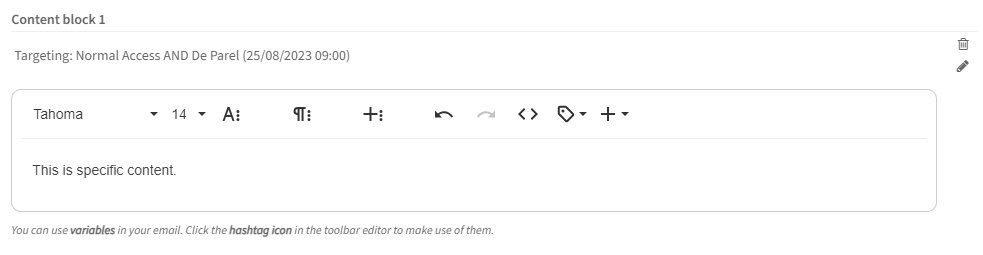
You can add multiple content blocks and/or delete/edit existing ones. You can also use the preview section on the left-hand side to get a preview of your created dynamic content:
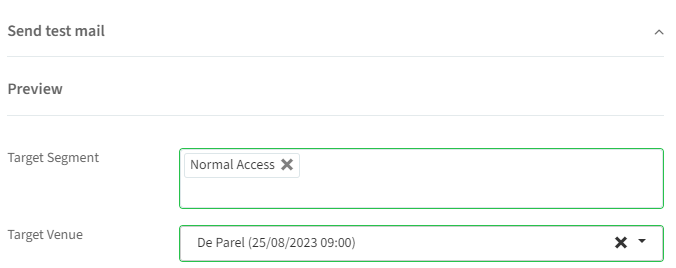
Tip: make sure to test this setup of emails beforehand by adding yourself to the invitation list and working with specific segments. We, at InviteDesk, are also always there to help if you need help with a specific setup and we can take a look at it together to see what is possible.
How to embed a page in an iFrame
In just a few steps, you can easily embed a page in an iFrame on your homepage for example. You just need to copy the link of your registration page or from the public page you have created in InviteDesk (see the Event website and Public Pages pages).
Replace the placeholder link below with the link you have just copied, to embed a page in the HTML code of your own site:
<iframe width="100%" height="100%" src=https://public.invitedesk.com/placeholder frameborder="0" name="_iframe"></iframe>Cancelling or rescheduling an event
It can sometimes happen you need to cancel or move an event. In this section, we will show how to easily do this and how you can communicate about this. There are two possible scenarios:
Scenario 1: The event is cancelled and is not rescheduled
Inform the people that already registered or were invited. Use the "Write new email" to send an informative mail to the selected target group (see "Mails overview" on the Event communication page).
Change the "Registration closed" date of the registration page to the date of yesterday. By doing this, you will make it no longer possible for people to register (see "Registration page" on the Event website page).
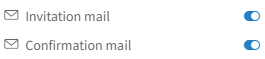
Pause all communications. On the dashboard of your event, you will see a button to pause all communications at the top right. By activating this functionality, you will make sure that all your scheduled e-mails will not be sent. You can also pause your communication e-mails individually by using the sliders in the communication overview.
Tips:
Rename your event. You could for example place "Cancelled" in front of the original event name. By doing this, you will make it obvious for other users and it makes it much easier to identify these events in the future.
You can always relaunch your event in just a few clicks by using the clone functionality (see the Clone or Remove an event page).
Scenario 2: The event is cancelled and a new date is available
Change the "Registration closed" date of the registration page to the date of yesterday. By doing this, you will make it no longer possible for people to register (see "Registration page" on the Event website page).
Clone the event (see the Clone or Remove an event page).
Edit the cloned event if needed and rewrite your invitation mail. In this invitation mail, you will inform your invitees that the previous date has been cancelled and that they can register again for the new event. Do not forget to publish your cloned event to activate your communication.
Advanced Lay-out
In InviteDesk, you have a very powerful WYSIWYG editor at your disposal, namely "Froala". There are many possibilities to give your communication that unique look. In this section, we will add some additional tips to give you that extra edge.
How to change the border color of a table
Add your table by clicking on the icon "Insert Table" in our editor. Here you can find an example:
Change the background color by using our editor. Here you can find an example:
Go to the HTML code by clicking on "Code View" and change the words "background" to "border". Here you can find an example:
Original HTML code:
Changed HTML code:
Go out of the HTML code by clicking on "Code View" again. This will save the changes you made in the code and it will make them visible. Your table will now look like this:
Click on "Save" and you have created a table with a specific border color.
How to create dashed borders or make the borders of a table not visible
Add your table by clicking on the icon "Insert Table" in our editor.
Highlight your table and select "Table Style":
Here you will find the options "Dashed Borders" and "No Borders". Depending on your choice, you can change your borders to dashed borders or you can make the borders disappear. Here you can find an example for both options:
Dashed Borders:
No Borders:
Click on "Save" and you have created a table with dashed borders or you made the borders of your table not visible.
How to change the font in an inserted table
Add your table by clicking on the icon "Insert Table" in our editor.
Go to the HTML code by clicking on "Code View". You need to add something to the code. Below is an example:
Original HTML code:
Changed HTML code:
Go out of the HTML code by clicking on "Code View" again. This will save the changes you made in the code and it will change the font in the table. Click on "Save" at the bottom.
Reporting an unknown error
In very rare cases, it can occur that the system does not work as expected or that a message will appear that an unknown error has occurred. Most of the time it will be a temporary interruption of the internet connection or a certain browser acting strange. First, we advise you to try again. If the error persists, we are of course ready to solve it for you.
In order to find a solution for you, it is important we know exactly what action you took to trigger the specific error. We recommend sending us a screenshot of the console and network status of your browser. Follow these steps:
When you are in your browser and on the page where the error occurred, press "F12" or "Fn + F12".
Click on the "Console" tab:
Then you need to refresh the page by pressing "F5". If an unknown error has actually occurred, chances are that it will now appear in the "Console" tab and in the "Network" tab.
Please contact your contact at InviteDesk with all the info you have obtained (screenshots of the errors in the console and network tab) and we will immediately investigate to detect and solve the unknown error.
File Formats to use
On different occasions, you can add various images or attachments to your communication. We have made an overview of the supported file formats* you can use:
Uploading images for your design template (logo and banner): file formats jpeg, jpg and png; maximum size 2MB (see "Design templates" on the Templates page).
Uploading images to use in our editor: file formats jpeg, jpg and png; maximum size 2MB (see "Registration page" on the Event website page and "Mails overview" on the Event communication page).
Uploading attachments to use in communication mailings: file formats jpeg, jpg, png, txt, csv, pdf, doc, docx, xml, xls, xlsx, ppt, pptx, pps and ppsx; maximum size 4MB (see "Mails overview" on the Event communication page).
A maximum of 3 files can be uploaded at a time and the general total amount of attachments per mail may not exceed 10MB.
Tip: for optimal deliverability of your mails, we recommend keeping the number and size of the attachments to a minimum.
*The rules are based on standards and security settings.
Usage of codes/labels for languages in upload Excel
You can easily upload an Excel file to add contacts, and you can make use of this feature in several places (see "Add invitees (Excel)" on the Invitation list page and "Import contacts" on the Address Book page).
In many cases, you may want to add the language of each contact to your Excel file. Below we have listed the different codes/labels* you can use for this purpose. In this way, the Excel file will always be uploaded correctly into InviteDesk.
*Uploads are not case-sensitive. This means it doesn't matter whether the characters are uppercase or lowercase.
Values for Dutch language: nederlands, dutch, néerlandais, niederländisch, nederländska, holandés, nl, nld, ndl, dut/nld, nl-be, nl-nl, be-nl, nlbe, benl
Values for French language: frans, french, français, französisch, franska, francés, fr, fra, fre/fra, fr-be, be-fr, fr-fr, frbe, befr
Values for English language: engels, english, anglais, englisch, engelsk, inglés, en, eng, en-gb, en-uk, en-us, en-en, enbe, been
Values for English (US) language: en-us
Values for English (GB) language: enbe, been, en-gb, en-uk
Values for German language: duits, german, allemand, deutsch, tysk, alemán, de, deu, ger/deu, de-de, debe, bede
Values for Swedish language: zweeds, swedish, suédois, schwedisch, svenska, sueco, sv, sve, swe/sve, sv-sv, svbe, besv
Values for Spanish language: spaans, spanish, espanol, spanisch, spanska, español, es, esp, es-us, es-es, esbe, bees
Clearing your cache
It can rarely occur that the "cache" of your browser/computer contains old files. Your browser/computer automatically saves data in the cache to, for example, make websites load faster. You can solve this by pressing "CTRL + F5". This will make the old files disappear from the cache and could lead to a solution when some users or invitees still see old data or something is not working as it should. Please note that this hardly ever happens.
FAQ
How can I change the maximum number of guests allowed per registration for certain guests?
In InviteDesk, you can configure different numbers of additional guests that invitees are allowed to bring to the event.
Step 1: Configure the default and maximum guest settings
Go to the settings of your registration page and open the section "Maximum number of guests" (see "Registration page" on the Event website page).
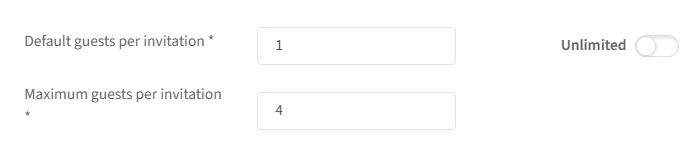
Maximum guests per invitation: this setting defines the maximum number of guests that can be registered per invitation, allowing for flexibility. Example: with default guests per invitation 1 and maximum guests per invitation 4, invitees can normally not bring any extra guests, but you can grant exceptions allowing selected invitees to bring up to 4 guests, so the main guest can register 3 extra guests with themselves.
Step 2: Apply the exceptions for specific guests or groups
Edit guest limit for an individual guest
Go to the invitation list.
Locate the relevant guest.
Click the pencil icon next to the guest's name.
Adjust the guest limit. You can set the maximum number of guests they are allowed to register with, up to the maximum defined in the settings (e.g. up to 4 guests).
Edit guest limit for a group of guests
Go to the invitation list.
Filter the group of guests (for example by segment or ticket holder).
Click the "Select all" checkbox at the top of the list.
Click the pencil icon that appears at the top of the list.
Adjust the guest limit. You can set the maximum number of guests they are allowed to register with, up to the maximum defined in the settings (e.g. up to 4 guests).
Note: if you are unable to change the amount of guests or the limit is lower than the one you set up, it might be because your guests are already registered with some additional guests, or because the ticket holder they are linked to does not have any remaining tickets available. If you upload an amount of guests via a column in an Excel file, it will also not be possible to manually change this number in InviteDesk afterwards.
How do I send out emails manually?
In InviteDesk, all emails can be sent automatically, but you also have the option to (re)send an email manually via the invitation list (see "Mails overview" on the Event communication page and the Invitation list page).
To send an email to a group of invitees:
(Optional) Filter your target group (e.g. by status, segment, or ticket type).
Select everyone in this group.
Click the envelope icon at the top of the invitee list and choose one of the emails created for your event.
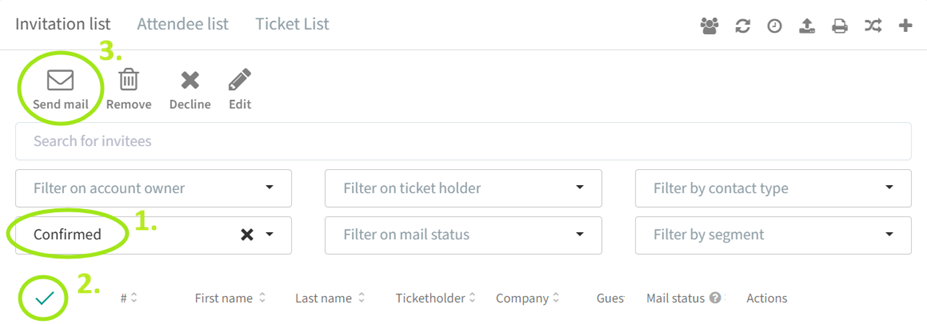
To send an email to a specific invitee: simply click on the envelope sign next to their name and choose one of the emails created for your event.

Note: the email will only be sent if the invitee's status matches the email type. For example, an unregistered guest will not receive a confirmation email, and an ad hoc email targeted at pending invitees will not be sent to a guest with a confirmed status, even if you select all guests and trigger sending this ad hoc email.
How do I manage expired invitations?
This section explains how invitation expiration works and how to reactivate expired invitations.
Configure invitation expiration
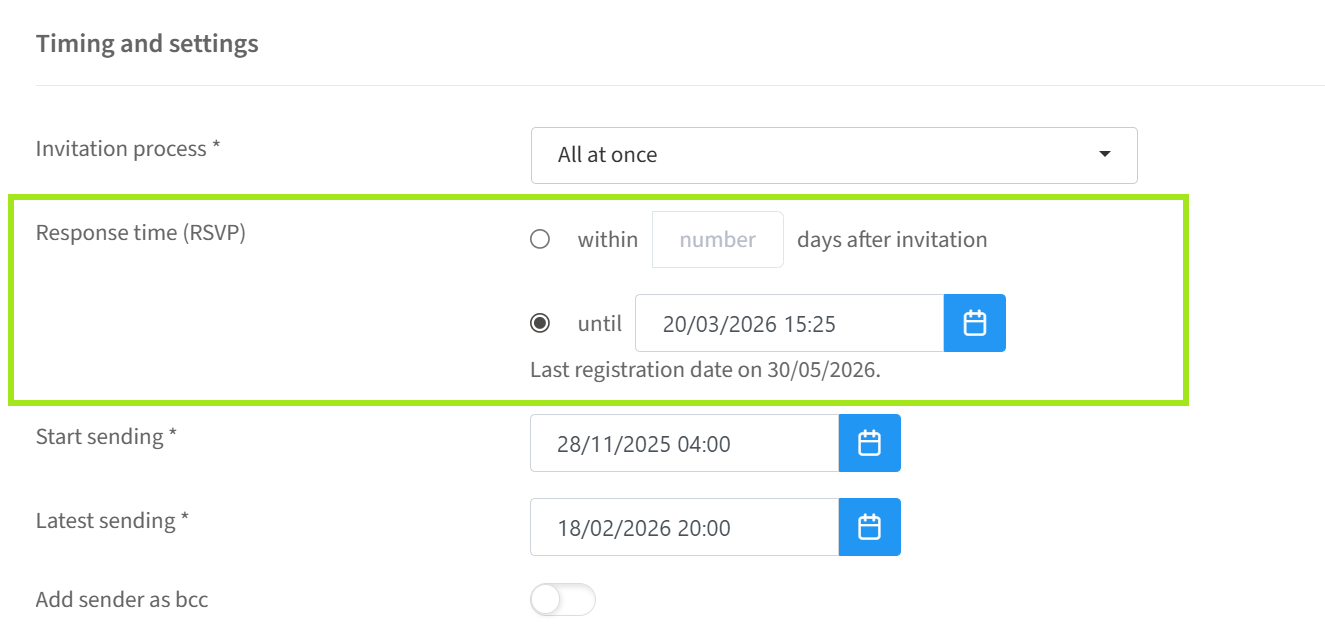
Whether and when invitations expire is defined in the settings of the invitation email. Before taking any further action, make sure to review and adjust these settings according to your needs — the changes do not have an effect on emails sent in the past. So if you have an invitation with an expired status, changing the settings won't reactivate it.
You can define either a number of days after receiving the invitation email or a fixed date on which all invitations will expire. If you do not want invitations to expire automatically, we recommend using the last registration date as the RSVP deadline.
What happens when an invitation expires
Once an invitation has the status "expired", the invited person can no longer register for the event.
How to reactivate expired invitations
To move guests from "expired" back to "pending", you need to resend the invitation email:
Go to the invitation list.
Filter by the status "expired".
Select all guests.
Resend the invitation email.
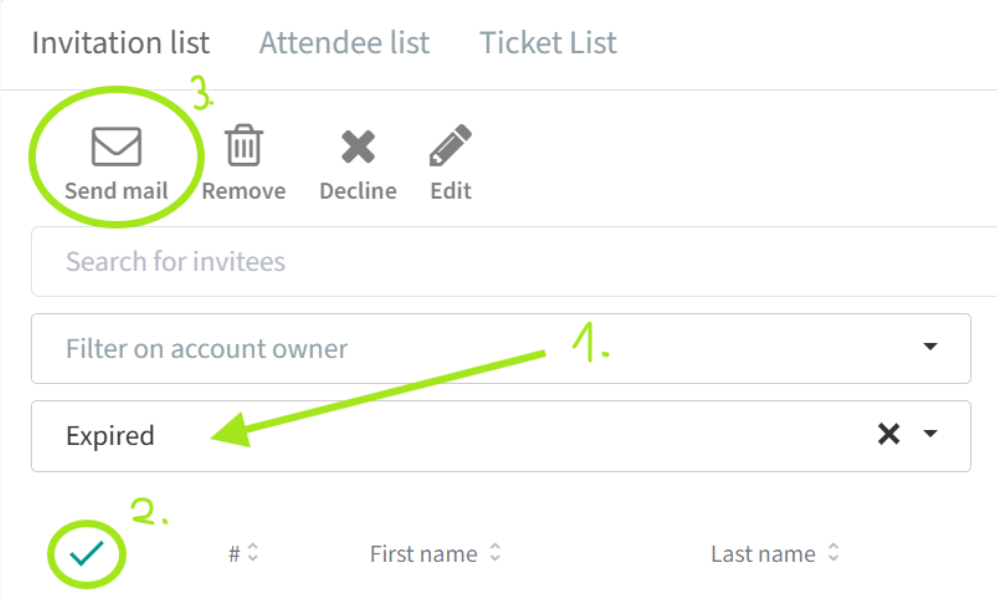
After resending, the guests will be able to register again.
Optional: when resending invitations, you can temporarily modify the content of the invitation email if needed. Afterward, you can revert the message back to its original version.
How do I manage paper invitations in InviteDesk?
If you wish to send out paper invitations, you can use a QR code that leads to the InviteDesk registration page on your invitations. With InviteDesk you have two options to do this. Note: creating a QR code from a link is possible using external tools (e.g. Canva).
1. Send a single QR code that leads to the public registration page
By using a general QR code, guests are directed to a public registration page for your event. You do not need to load any invitees into InviteDesk beforehand, and you will only see who registered. The downside is that you cannot track who declined or did not respond to your invitation.
Simply copy the registration page link. For multi-language events, repeat for each language — this link sets the default language, but guests can switch between languages after opening the page:
Generate a QR code using an external online tool (we recommend the Canva QR code generator).
Now you can use this QR code in your physical invitations.
2. Send personalized QR codes that lead to each invitee's personal registration page
If you want to track which invitee registered, declined, or has not responded yet, we recommend sending personalized QR codes linking to their individual registration pages.
Upload your invitation list to InviteDesk.
Export your invitation list including Name, Email, and Registration URL.
Open your downloaded Excel file.
Generate a QR code with the personal link for each guest using an external online tool (we recommend the Canva QR code generator).
Use this QR code in your physical invitation. You can then track in InviteDesk the status of each invited guest — whether they declined, registered, or haven't registered yet.
Why is my email not getting sent?
In this video we show you a checklist of reasons why your email is not getting sent:
00:22 - Is your event published?
00:30 - Is the target already reached?
00:40 - Do your ticket holders have access to tickets?
01:07 - Does the contact have permission to receive emails from you?
01:30 - Does the contact have the status bounced or blocked?
01:37 - How long have you been waiting?
01:48 - Contact support
What to do if you can't send mails
Are you unable to send emails? We are here to help. There could be several reasons for this. Please be sure to check the following:
Is your event published in InviteDesk? Make sure the event is no longer in "Draft" status.
Are there still places available? If your event has "Target" 0 and "Overbooking" None, no invitations will be sent. You can edit the "Event details" of your event to change this. If your event has "Overbooking" None and the number of registrations equals your target, no new invitations will be sent. If your event has plenty of places available and you are sending invitations in the name of a ticket holder, make sure the ticket holder has places available or access to "Unallocated". You can activate this in the ticket holder menu of an event:
Double-check the permission settings of a specific contact in the Address book. If you are unable to send an email to a specific contact, you should search for this contact in the Address book. Go to the "Address book" in the general menu. When you have found the specific contact, click on the pencil icon and navigate to the "Permissions" tab. If the following is not activated, you will not be able to send emails to this contact. Below is an example with activated permissions:
If you activate these manually, be sure you have the permission of the contact to do so.
A contact has mail status bounced/blocked. If you are certain that the mail address of your contact is correct, you can contact us to unblock this mail address. You can make this request by creating a support ticket on our platform.
How do I apply routing to questions on the registration page?
In this video we show you how to apply routing to questions on the registration page:
00:33 - Routing on an answer option of a question
01:34 - Routing on venue and date
02:09 - Routing on questions in multiple languages
Routing your questions
When you are creating your registration page, you can decide which questions you will ask on this page. This usually depends on the amount of information you need from your invitees (see "Registration page" on the Event website page).
When you are adding the questions you would like to ask on the registration page, you can easily apply what we call "a routing". In the example below, we used a routing where the second question will only appear on the registration page if an invitee has answered "Yes" to the first question:
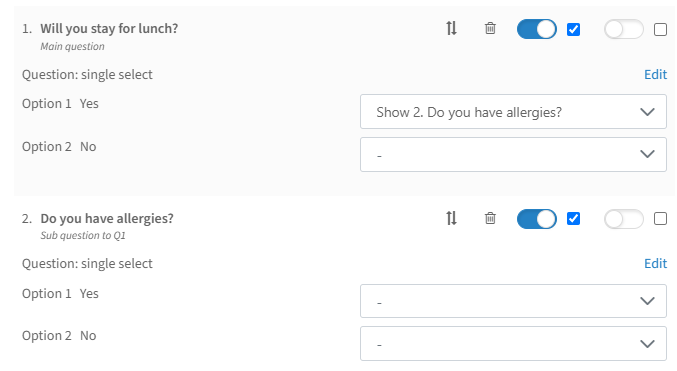
If an invitee answers "No" to the first question above, they will not see the second question.
If you have more than 1 venue, you will notice that an additional option will be available: "Routing on venue and date":
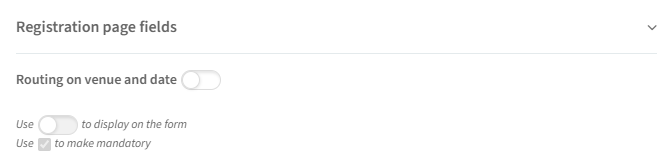
Per venue, you can then decide which questions will be visible. An example below:
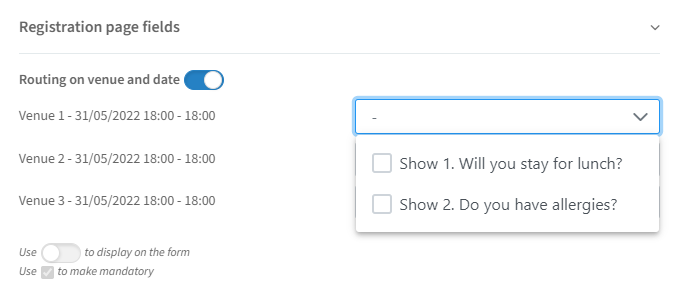
Tip: if you are creating a complex registration page, save your progress and go test it out yourself by going to your own registration page. If you see you have made mistakes, you can always come back to make small adjustments until you are satisfied.
How do I update contacts by re-importing an Excel file?
In this video we show you how to update the contact details of your guests by importing an Excel into the invitation list of your event:
00:56 - Export the invitation list
01:29 - Update information in the columns
01:52 - Add a new column to add new information
02:16 - Import the updated Excel file in the invitation list
02:38 - Choose the default values
03:17 - Add this list to a segment
03:43 - Link the columns to the contact fields
04:33 - Check if the contacts are valid
04:40 - Check if existing contacts are detected
04:51 - Add and update contact details
How can I use segments to target a specific audience in my communication?
In this video we show you how to divide your invitees into segments in order to create dynamic content by targeting specific audiences in your emails and on your registration page:
video
00:48 - Create segments
01:43 - Add a not yet registered guest to a segment
02:11 - Add an already registered guest to a segment in the invitation list
02:39 - Add multiple guests to a segment
02:50 - Add an already registered guest to a segment in the attendee list
03:32 - Import guests into a segment
04:41 - Use conditional targeting in your email (paid feature)
06:09 - Use a segmented registration page (paid feature)
Video tutorials
Tuto / Cours en Français
These videos play from YouTube, which may set cookies.
 Créer un événement sur InviteDesk
 Créer une page d'inscription sur InviteDesk
 Ajouter des invités sur InviteDesk
 Gérer les invités sur InviteDesk
 Configurer la communication événementielle sur InviteDesk
 Optimiser la communication événementielle sur InviteDesk
Paid events: Stripe & Paydesk
In this video we show you how to set up paid event registrations in InviteDesk, and help you choose between Stripe and Paydesk.
Stripe is the simplest option: connect your Stripe account, set the currency and whether refunds are allowed, and configure pricing, VAT-inclusive amounts, and promotions. Payment happens immediately on the registration form.
Paydesk offers more flexibility: multiple payment providers, bank transfer, invoice generation, credit notes, and payment confirmation documents. When enabled, extra invoice fields also appear on the registration page.
Note: guests will show a "payment pending" status in the invitation list for about 15 minutes if they start but don't complete payment.
00:00 - Introduction
00:09 - Stripe vs Paydesk
01:18 - Create a paid event
02:17 - Paid event with Stripe
02:51 - Pricing
03:51 - Promotion codes
07:23 - Payment pending status
08:12 - Paid event with Paydesk
08:49 - Payment settings: payment providers, paydesks, invoices
18:02 - Payment document mail
19:06 - Payment details on the registration form
Guest management: invitation, attendee and ticket list + ticket holders
In this video we show you how guest management works in InviteDesk: status visibility on the event dashboard, working with the full invitation, attendee, and ticket lists, adding invitees directly or importing them via Excel, handling duplicates, invitation statuses (waiting, pending, confirmed, declined, cancelled, expired) and the RSVP deadline, exporting the attendee list, and how attendee statuses and check-in, no-show, and check-out tracking differ from invitation-list statuses.
00:00 - Dashboard data
01:24 - Invitation list data
06:06 - Ticket holders
08:32 - Import guest list
16:51 - Invitation list statuses, filters & actions
21:25 - Export attendee list
23:10 - Attendee list statuses, filters & actions
25:17 - Ticket list data
Check-in at your event: Frontdesk vs. ScanApp
00:00 Frontdesk vs. ScanApp
00:42 QR codes & access rights
04:35 Frontdesk users
05:25 Frontdesk as internal user
07:51 Frontdesk as external user
10:25 Results in the attendee list
11:01 ScanApp setup
12:50 ScanApp Scan Points
17:05 ScanApp users
19:33 ScanApp Guests
20:07 ScanApp Check-in
21:36 Frontdesk vs. ScanApp
Communication flow: manage your email timeline
00:00 Email timeline overview
01:13 Save the date email
01:38 Email design & variables
05:58 Registration open & closed date
06:32 Invitation email
07:42 Personal or public registration link
09:55 Response time (RSVP)
13:10 Invitation process: all-at-once or one-by-one
16:44 Invitation start & stop sending date
17:33 Send SMS alert & add sender as bcc
18:19 Reminder email & internal reminder email
21:18 Confirmation email
24:55 Pre-event email & thank you email
28:00 Tickets email & payment document email
30:33 Ad hoc emails
Personalized branding with (Advanced) Design Templates
00:00 Introduction
01:20 Create a design template and add it to your event
02:43 Guide through the design template settings
03:20 Tab 1: General
04:30 Tab 2: Header
08:28 Tab 3: Banner
10:18 Tab 4: Content
15:23 Tab 5: Buttons
19:38 Tab 6: Footer