Paid features
Features included in the Premium or Platinum package.
On this page:
Premium features
Segmented registration page
If you are using segments in InviteDesk, you can personalize your registration page based on which segment your guest belongs to (see "How can I use segments to target a specific audience in my communication?" on the Tips & Videos page).
There are three ways to use segments when creating your registration page: show specific venues to certain segments, show questions to specific segments, and show different answer options for specific segments.
In the examples below we use two segments, "VIP" and "Guests", but you can create any segments depending on your event's needs. The "Default" option determines what is shown to guests who are not part of any segment. The "Public Registration" option is for guests who did not receive an email invitation but registered directly on the website.
Venues by segment
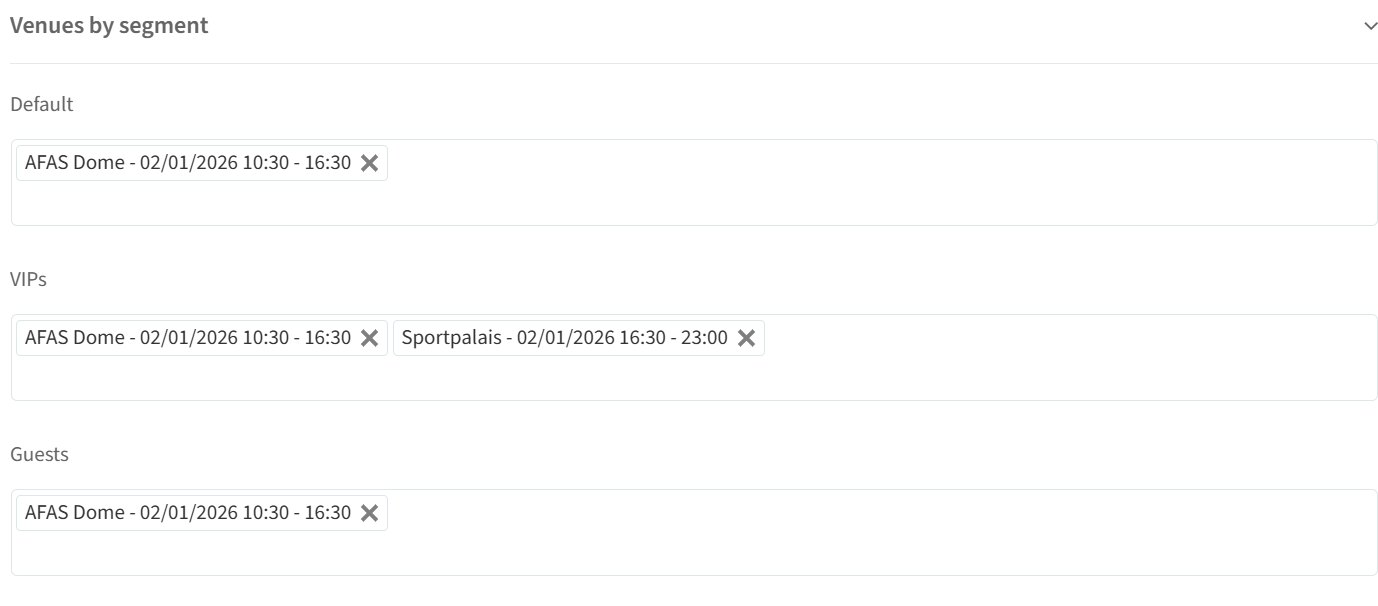
If you have created a multi-venue event, you can make certain venues visible only to specific segments. Go to the Design your registration page tab, scroll to the section between Registration page text and Registration page fields, and assign venues to segments as needed. Only guests in the selected segments will see the relevant venues.
Questions by segment
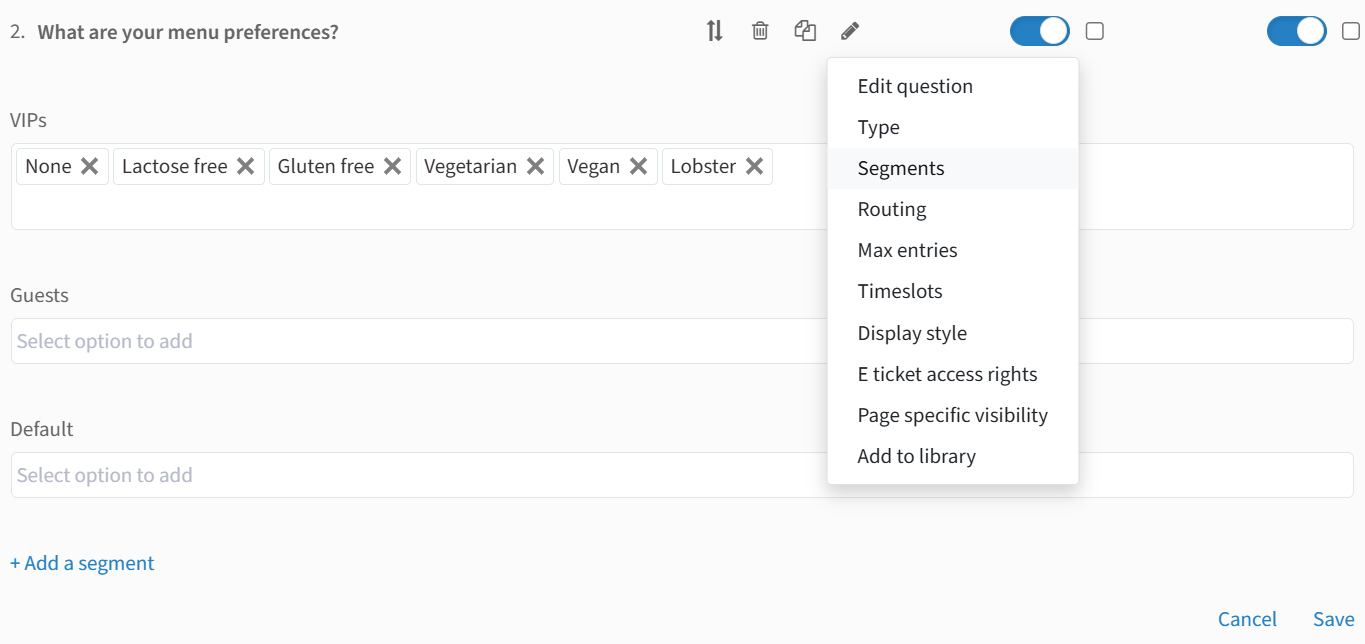
To ask a segment-specific question: click the pencil icon next to the question, select Segments, and remove the answer options from segments that should not see this question. Example: question 2 — "What are your menu preferences?" — is shown only to the VIP segment. Note: currently this works only for single-select and multi-select questions.
Answers by segment
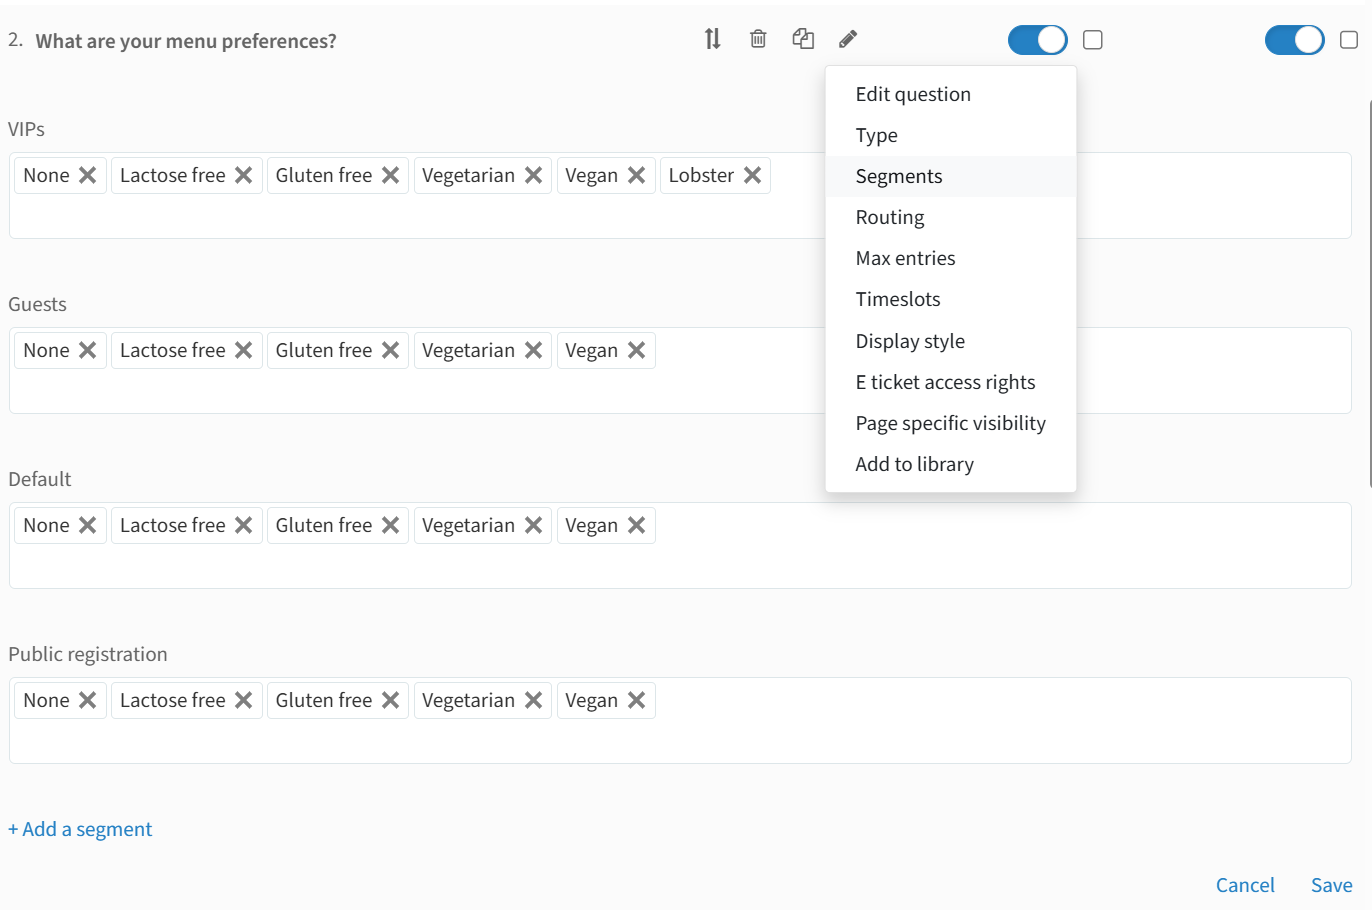
To show different answer options to different segments: click the pencil icon next to the question, select Segments, and choose which answer options are visible to which segments. Example: for the VIP segment the Lobster option is available, while it is removed for the "Guests" and "Default" segments by clicking the x next to the option name. Tip: don't forget to remove the options for the Default and Public Registration segments as well, if you only want to show them for one segment specifically.
Multi-select limit
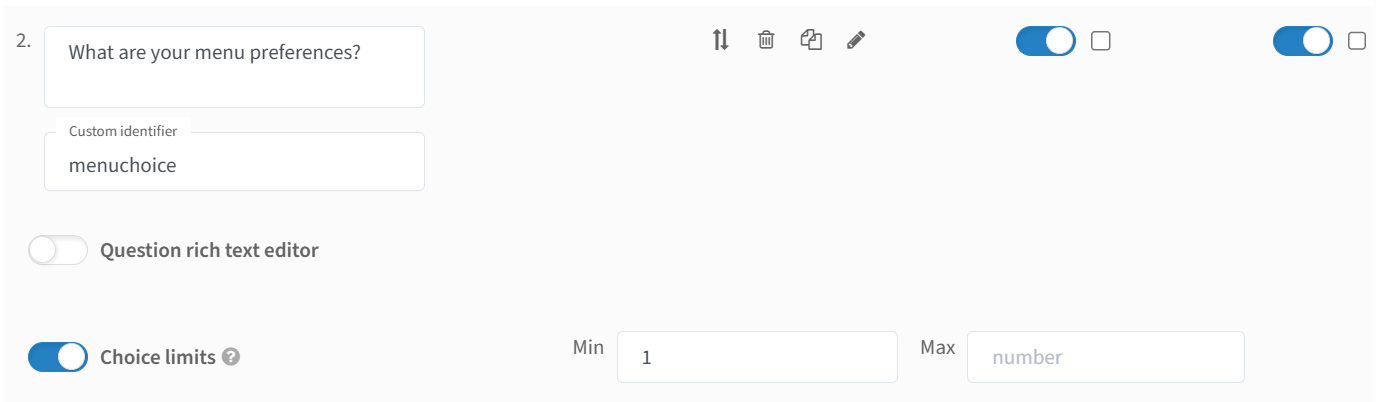
On multi-select questions you can set a limit of minimum and maximum amount of answers your guests can select. When creating or editing a registration page question:
Click on Edit Question (the pencil symbol).
A Choice limits toggle will appear below the question.
Set the Choice limits toggle on.
Set your minimum and maximum choice limit.
Sub-options
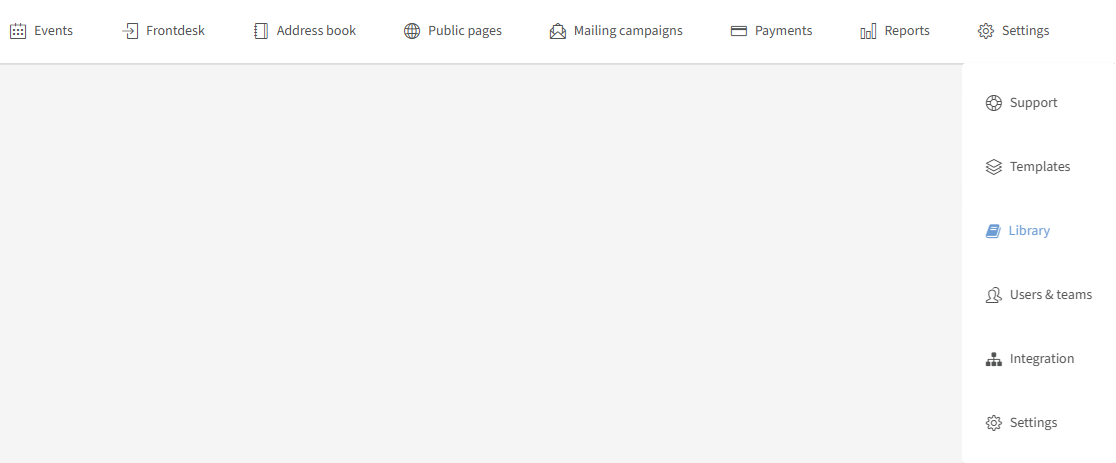
You can create sub-options for your registration page in your Library. You can find the Library section on the top bar in the dropdown menu of the "Settings" tab (see "Registration page: create a predefined question" on the Library page).
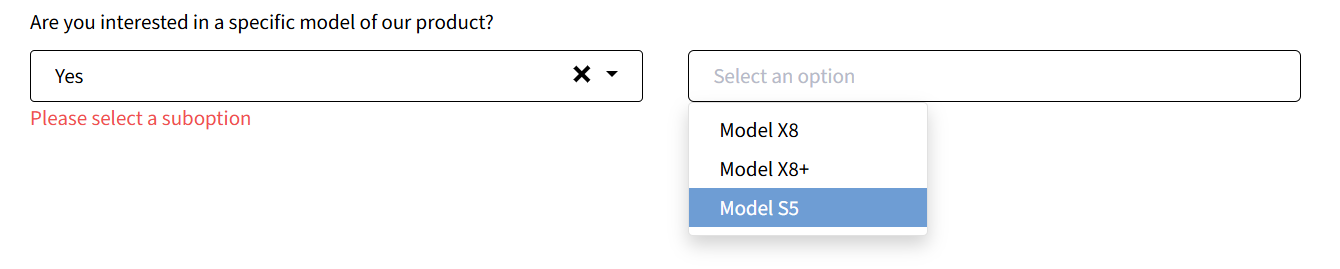
In InviteDesk, there are two ways to create conditional questions: sub-options and routed questions. A sub-option displays an additional set of answers next to the original question, rather than below it. A routed question displays the additional question separately below the original question (see "How do I apply routing to questions on the registration page?" on the Tips & Videos page).
Example of a NO answer without additional sub-options:

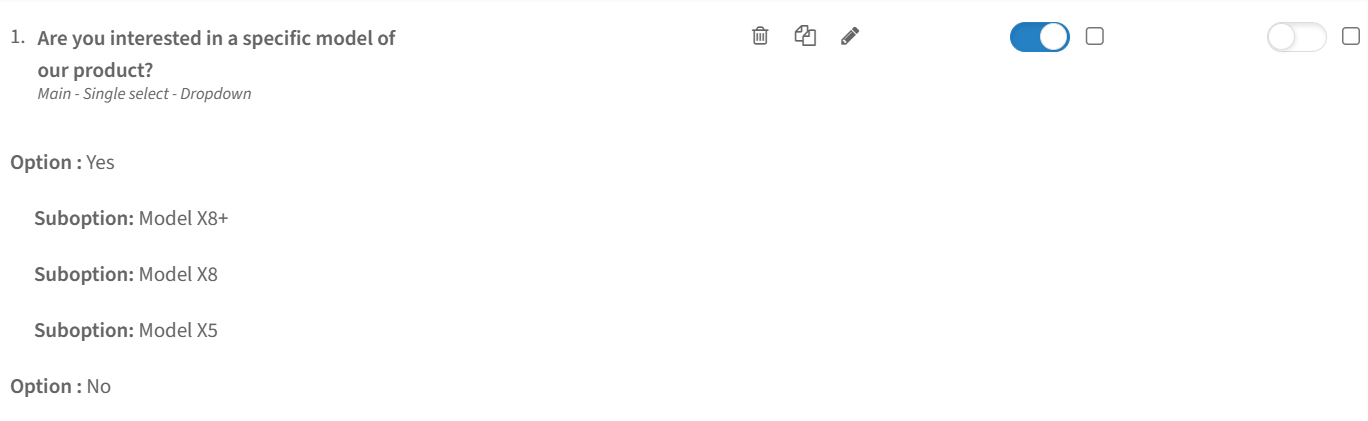
Example of a YES answer with connected sub-options:
How to create a single select sub-question
You create a sub-option in the Library and then add it to your registration page. It is not possible to create a question with sub-options directly on the registration page, unlike other question types.
Create a single-select question in your Library.
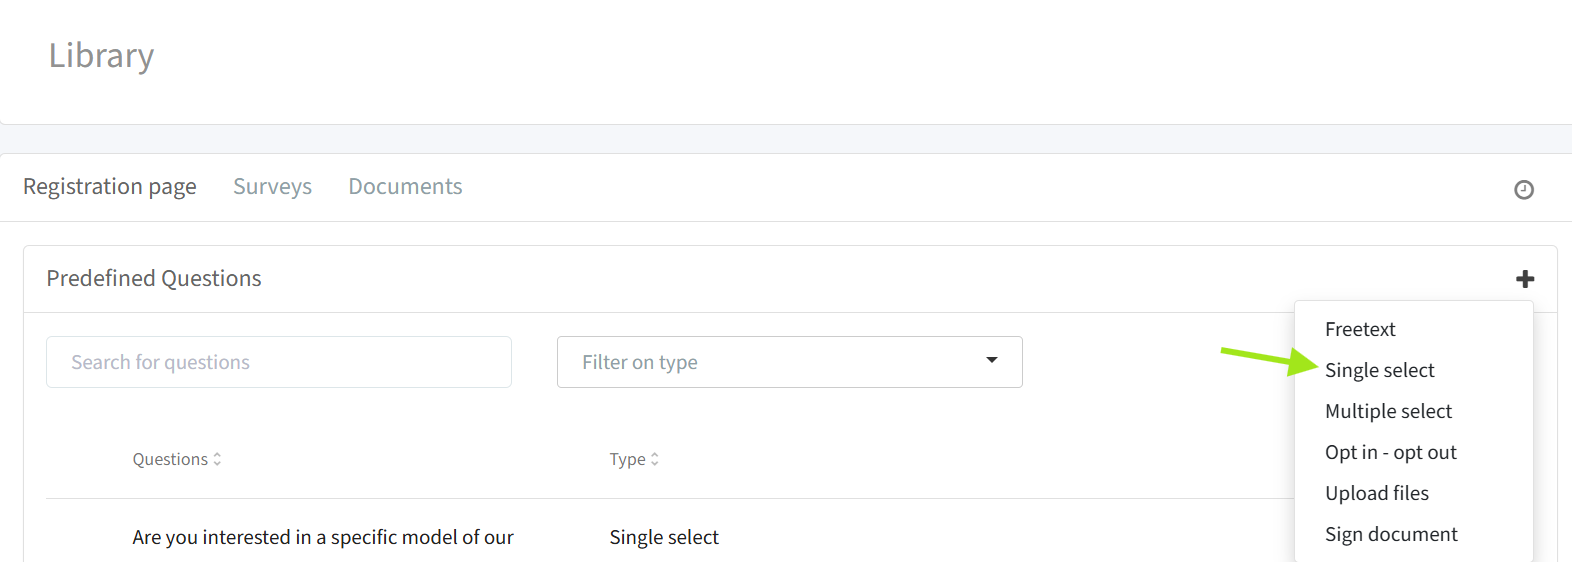
Add the required answers (e.g. Yes and No) and sub-options (e.g. a list of models under the Yes answer). You can add sub-answers by clicking the sub-option icon
— each click adds one additional option field to the form. Tip: don't forget to add translations for the question in all languages used on your registration page.
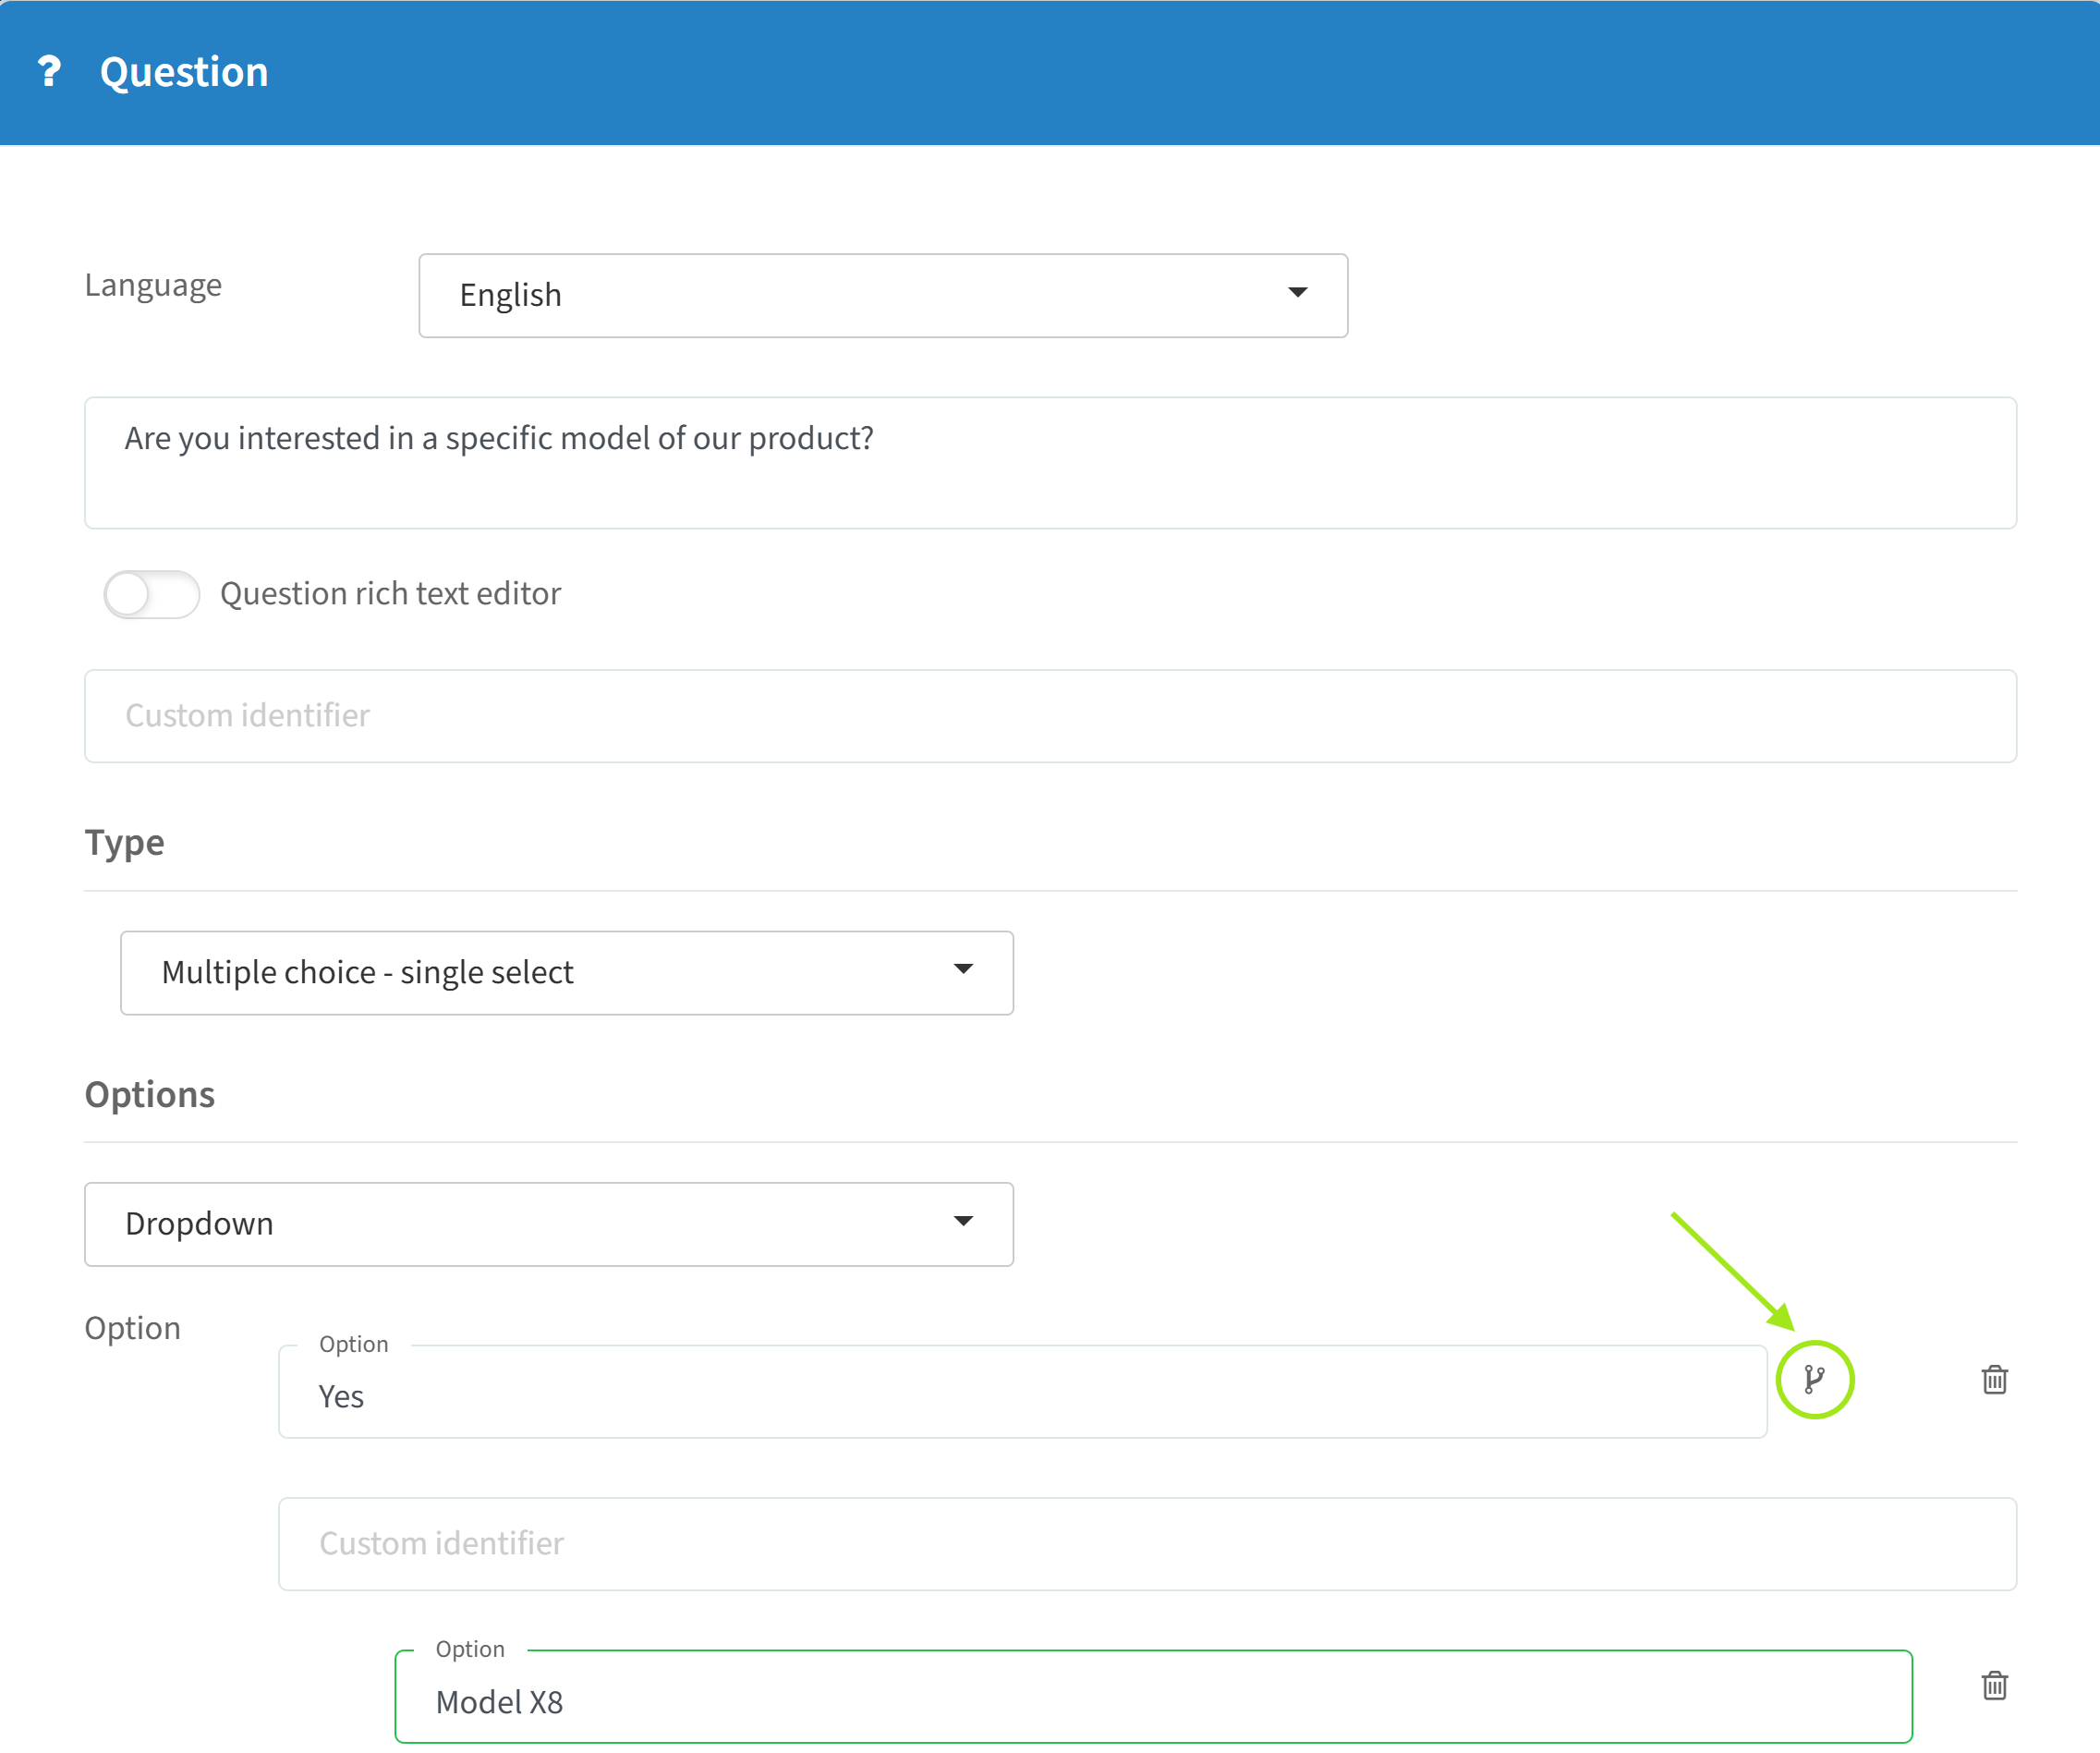
Save the question.
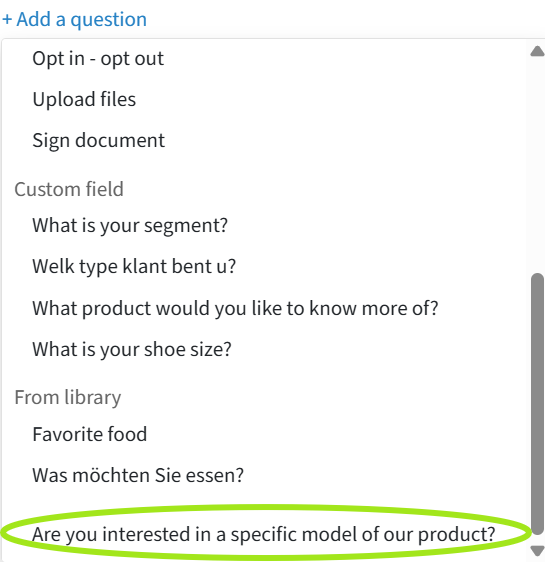
Go to your event Dashboard > Registration page > click on Add a question and select the question from the Library.
Make the question visible on your registration page by switching the blue toggle on. Your added question with sub-options will look like this:
Custom identifiers
You can use custom identifiers in the questions of your registration page in order to:
Save and match information from the registration page to your CRM database.
Use answers from the registration page as a custom variable in communication with your guests.
Connect the answers from the registration page to a Custom contact field (see the Custom contact fields page).
How to create a custom identifier
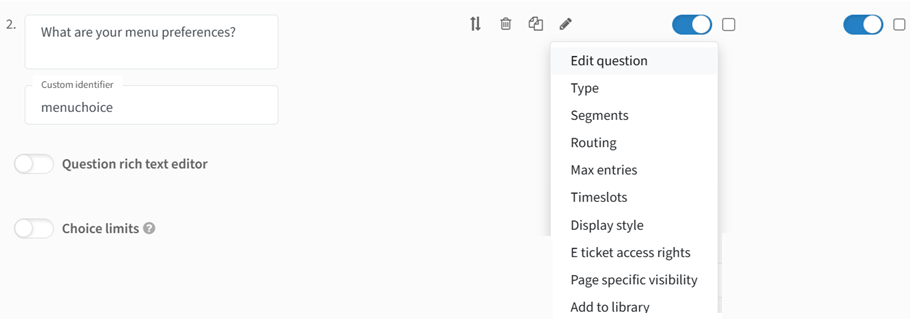
When creating or editing a registration page question: click Edit Question, a Custom Identifier field will appear below the question, and enter the name of your custom identifier in this field.
Mapping values from the CRM: example — customers_london can be a custom identifier used to link an option to an existing value in the CRM.
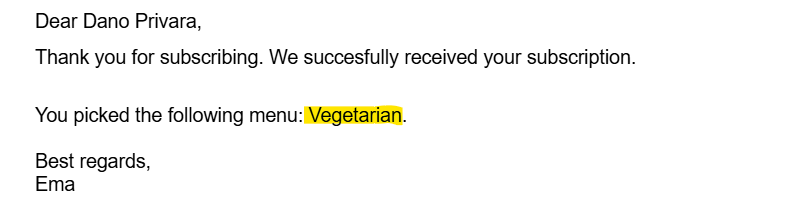
Creating custom variables for email communication: suppose menuchoice is the name of your custom identifier for a multiple-choice question about dietary preferences. By using this variable in your confirmation email, guests will see the option they selected directly in their confirmation email:
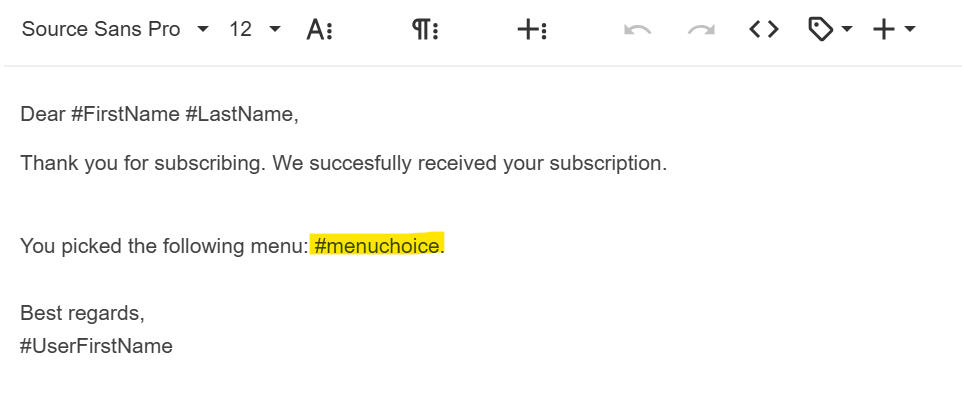
Example of a confirmation email your guests might receive:
Smart fields
Smart fields allow you to use custom identifiers (see above) in an advanced way. You can only use them with Custom contact fields (see the Custom contact fields page). They allow you to set a simple rule: when a contact has a specific answer in a custom contact field, the system automatically assigns a matching value to the custom identifier.
Custom identifiers can be used only with custom contact fields that have a fixed list of options, so not a Free text.
Example: if the contact's Gender is Female, you can create a smart field that determines the correct salutation — "Chère" in French and "Liebe" in German. You can then use this smart field in your email by inserting #salutationsmart.
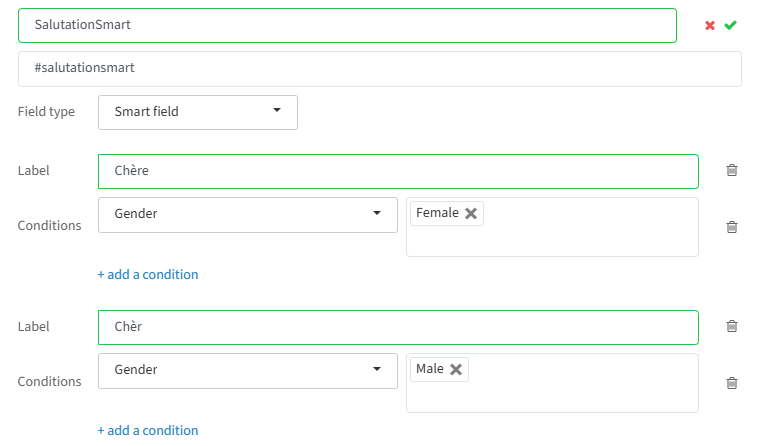
To create a new smart field, click on "+ add a field" and follow these steps:
Give your field a name.
Attach a custom identifier to the field, which you will use as a variable in your emails. This is mandatory when creating a smart field.
Field type: in this case a Smart field.
Label: the word you want to use in your email as a variable.
Conditions: pick from existing custom contact fields (except free text ones) and select for which value in the custom contact field you want to use the respective label. You can add conditions to use the label for a combination of multiple values.
Add label: if you want a different label connected to a different value in the custom contact field.
Default label: used in case the value is unknown for the contact.
An example of a smart field that adjusts the salutation based on the gender in German — if the value is unknown it uses "Liebe/r":
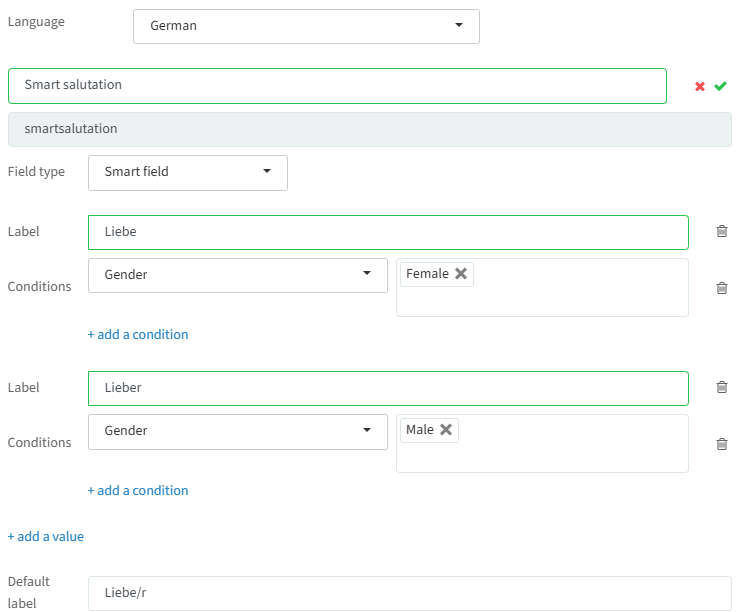
Tip: make sure to add translations to the labels for all languages you work with; otherwise, you won't be able to save your smart field.
Text template labels
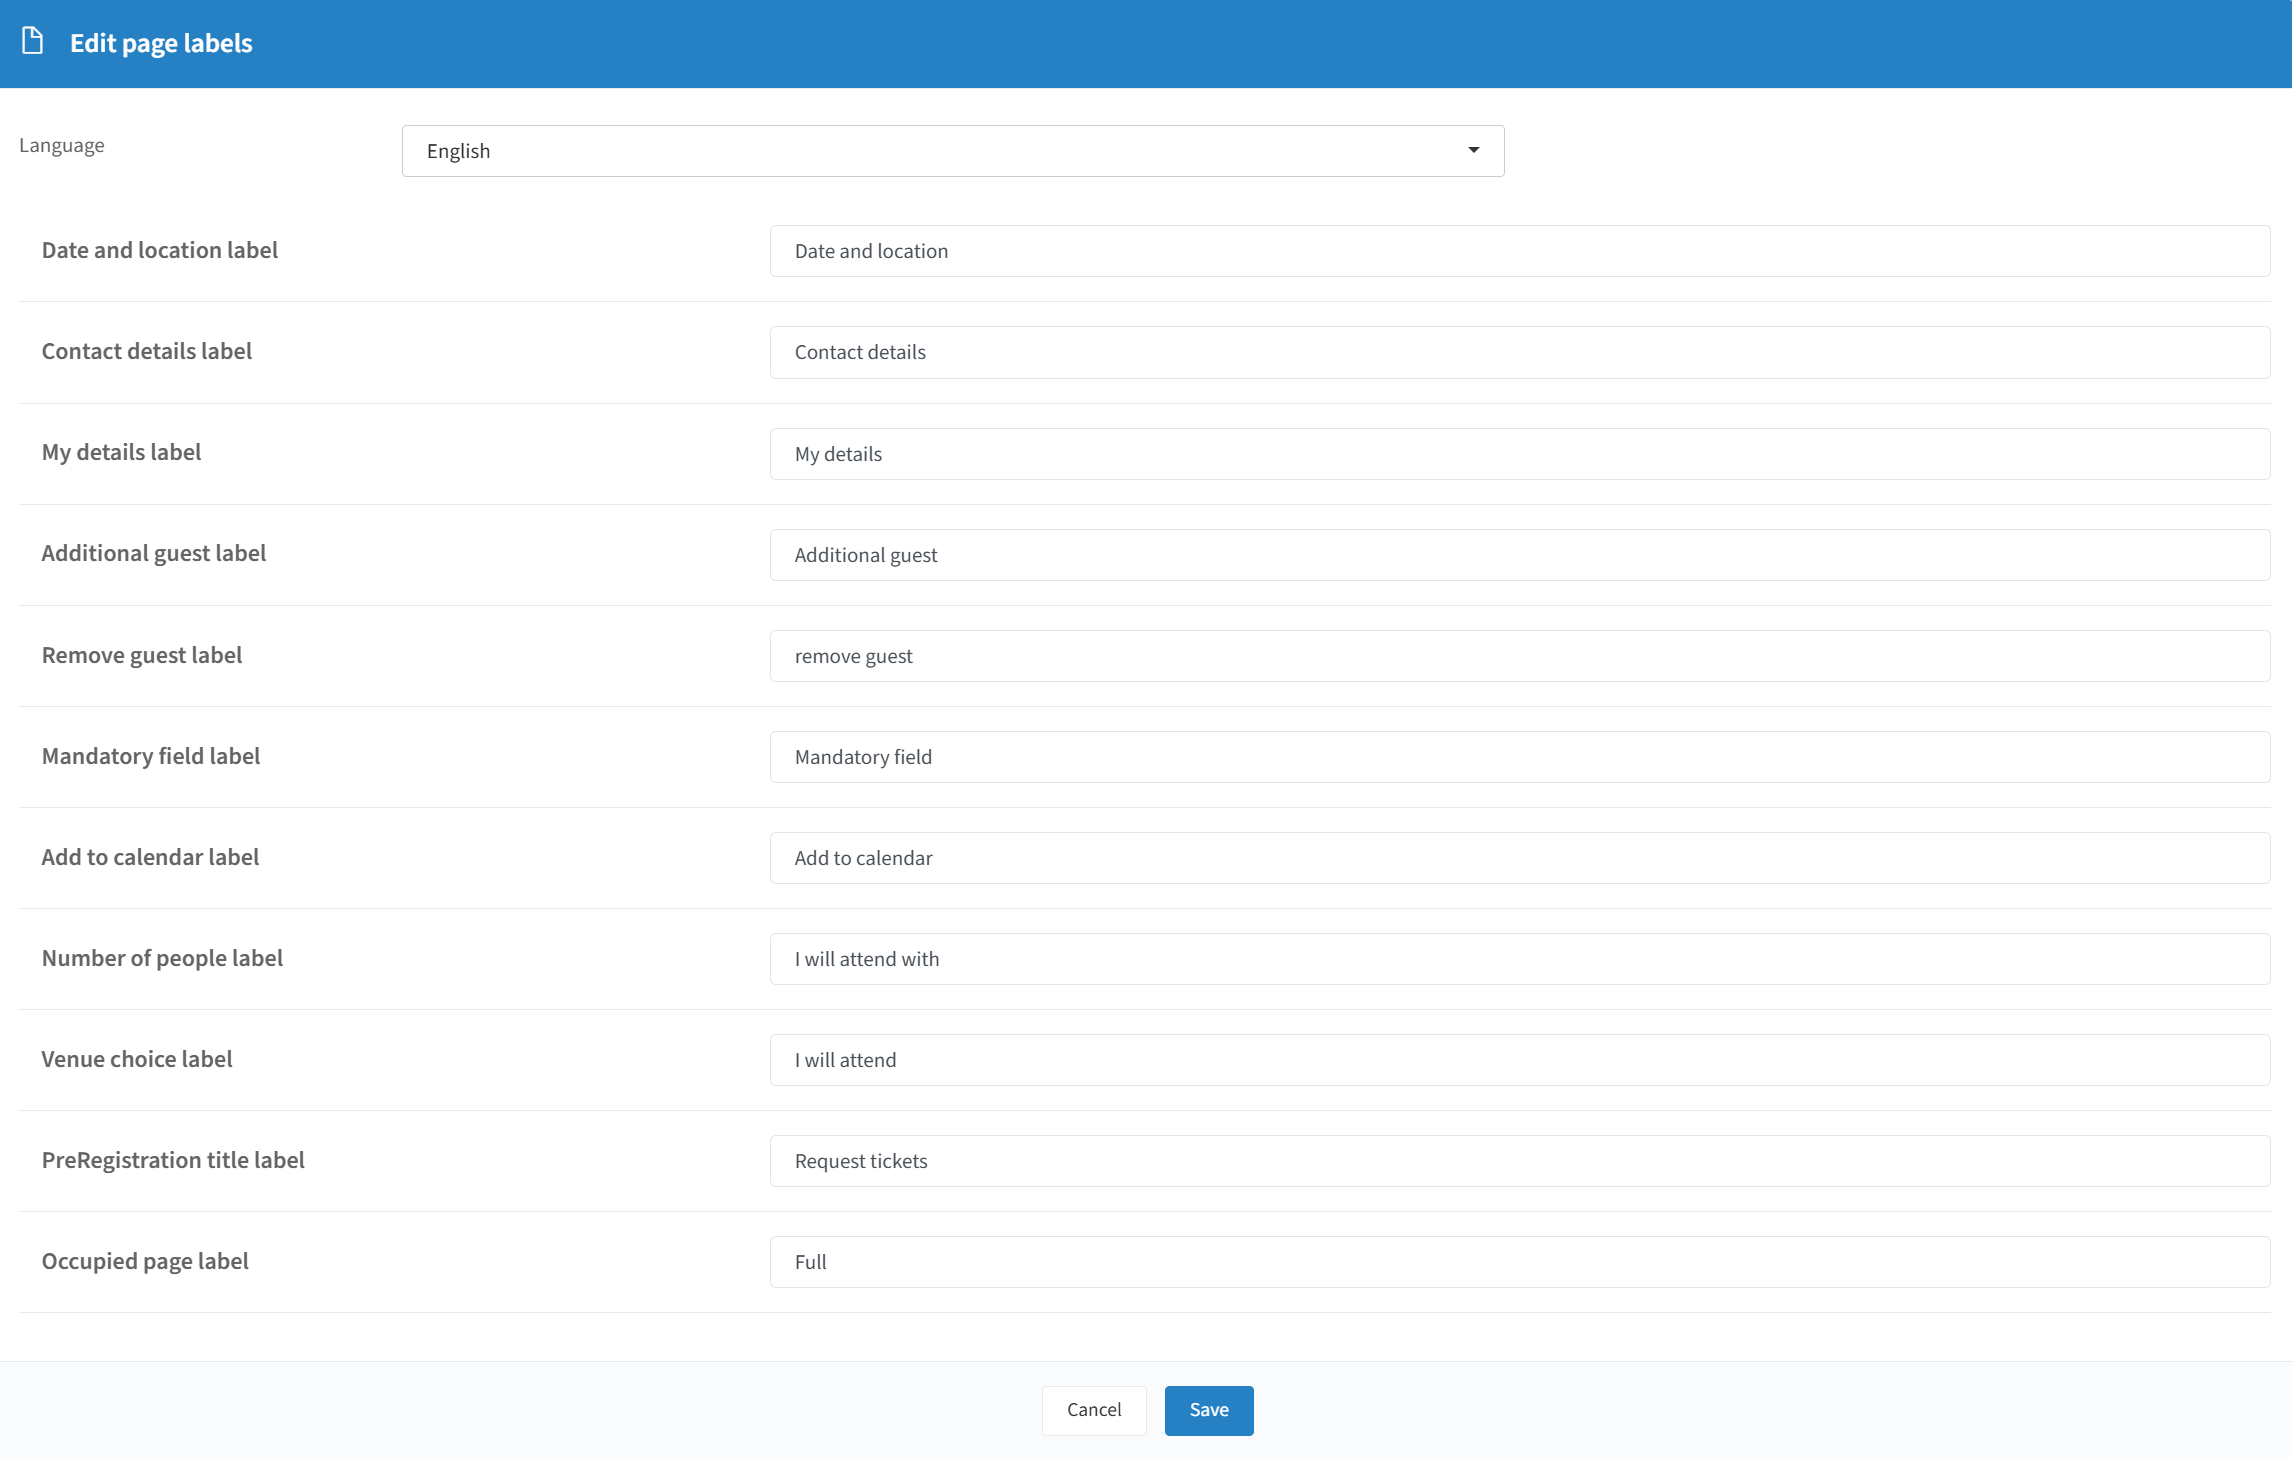
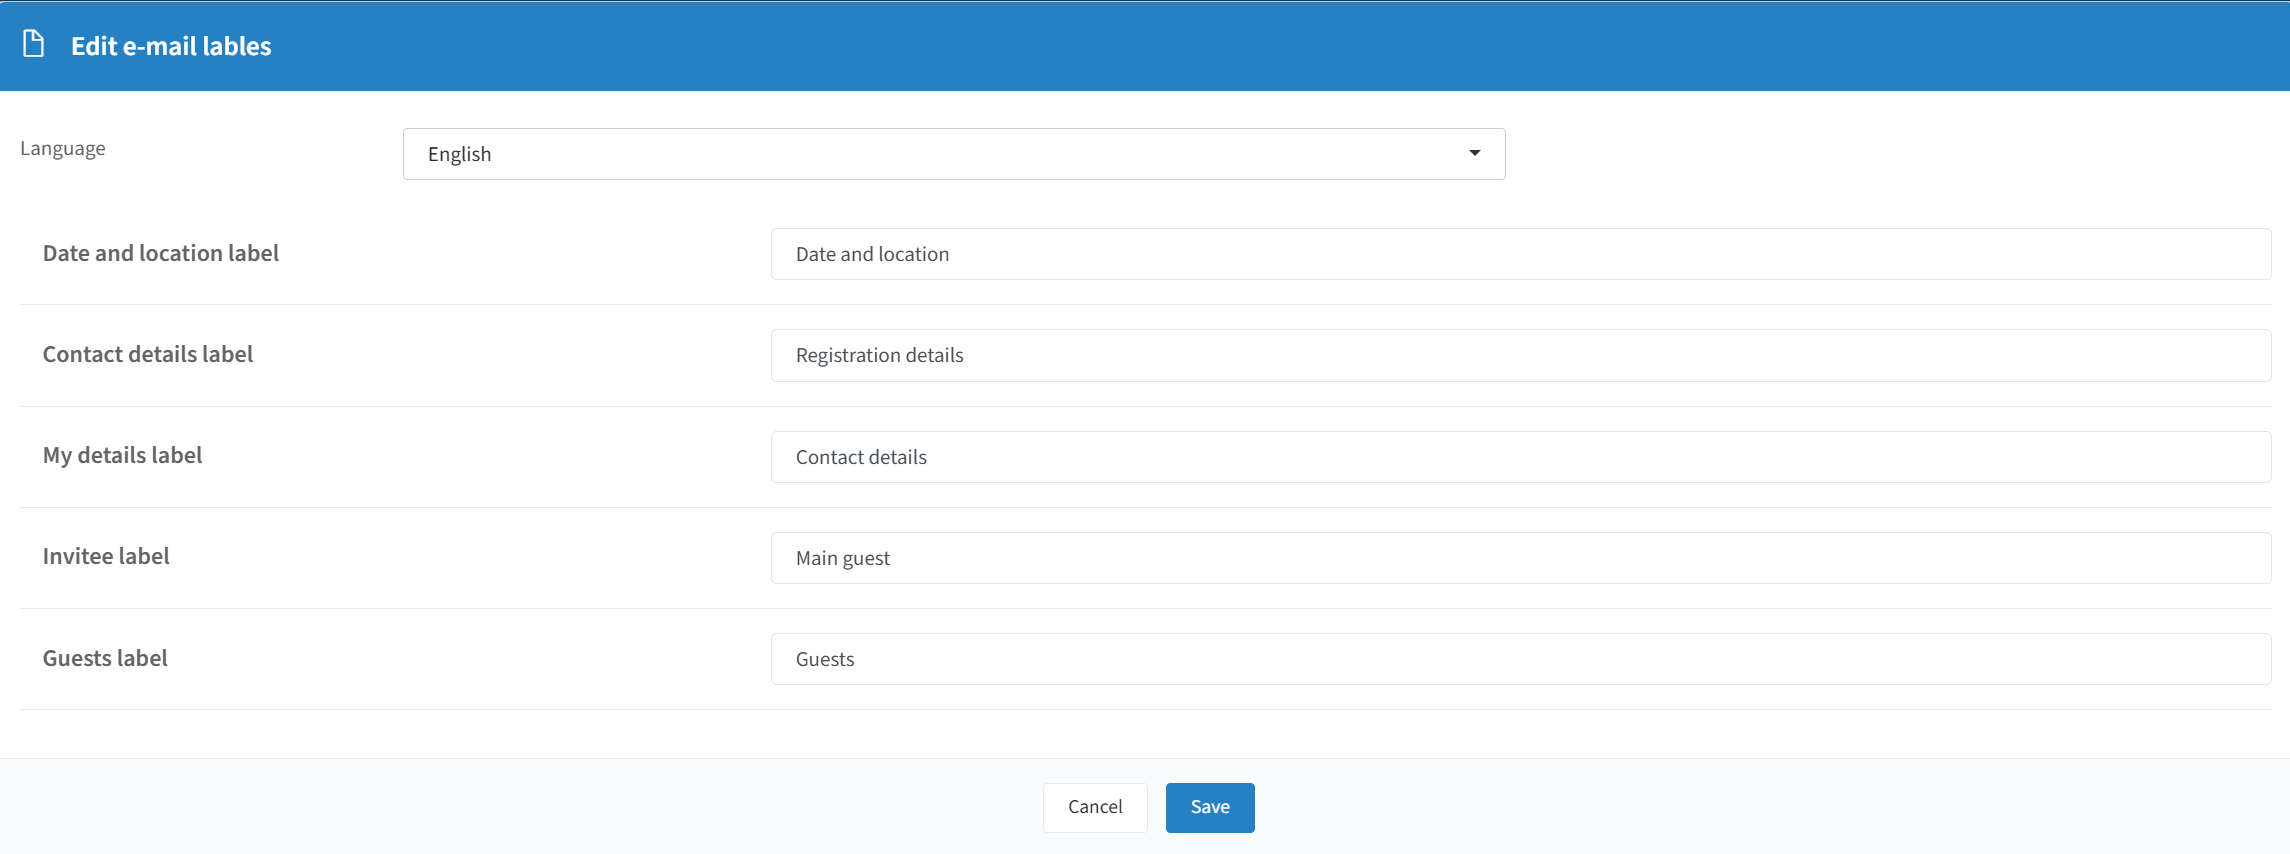
In Text templates you can change the content for your Landing page and Scheduled emails — with this feature you can also change the text labels on your landing page and emails (see the Templates page). If you want to change the button labels in your emails and on your website, you can do so in Design templates instead.
Page labels: change these in the "Landing page content" of your Text templates. This allows you to customize your landing page messages.
Email labels: change these in the "Scheduled emails" section of your Text templates. This allows you to customize your email messages.
Tip: if you are organizing a multilingual event, don't forget to change the text labels in all of the languages you are using in your event communication.
Platinum features
Conditional targeting
If you use segments for your audience, you can target parts of your emails to specific segments or venues (see "How can I use segments to target a specific audience in my communication?" on the Tips & Videos page). If you want to create a personalized view of your registration page, see "Segmented registration page" above.
With conditional targeting, you can add multiple content blocks to an email and show each block to specific guest segments or guests attending specific venues. You can also keep certain content blocks visible to all guests.
Note: invitation emails can only be targeted by segment, not by venue, since you won't know which venue guests will choose in advance.
Adding targeted content blocks:
Click "Add content block".
Click Edit (the pencil icon) on the content block.
Select one or more target segments and a target venue.
Tip: if you are organizing a multilingual event, don't forget to add text in content blocks in all of the languages you are using in your event communication.
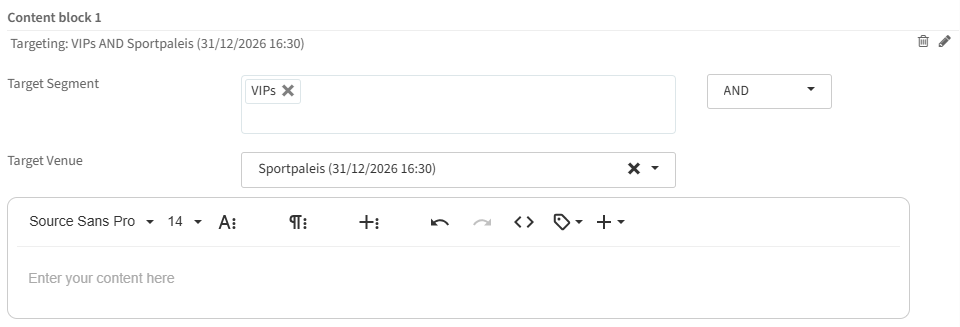
Targeting multiple segments/venues: to show a content block to guests who belong to any of the selected segments/venues, choose OR and add multiple segments (example: VIPs or Sportpaleis). To show a content block only to guests who belong to all selected segments/venues, choose AND (example: VIPs and Sportpaleis).
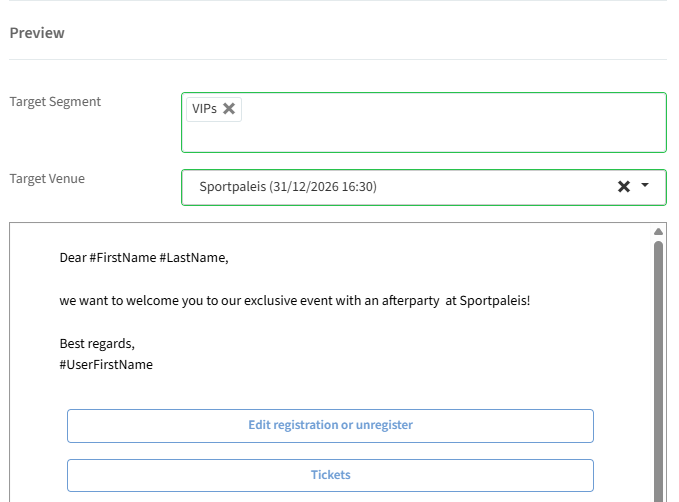
Previewing emails: in the preview on the left side, you can switch the point of view to see how the email looks for each selected group of guests.
Pre-registration
Pre-registration is a paid Platinum feature. If you would like to enable this feature, please contact us.
Pre-registration allows you to create a waitlist or pre-registration flow for your event. When guests complete the pre-registration form, which is automatically generated when they access the event via the public page, they appear in the invitation list with the status "Waiting".
As the organiser, you can review these requests and decide which guests to invite. Once approved, you can send the invitation email, granting them access to the actual registration page of the event where they can complete their registration.
This can be configured in the communication setup of your event, which you'll find on the right-hand side of your event dashboard (see the Communication setup page).
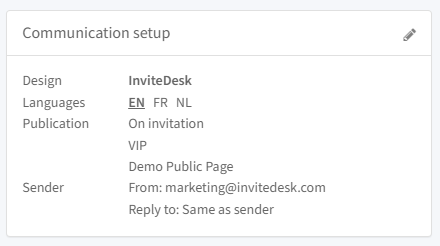
How to enable pre-registration for your event
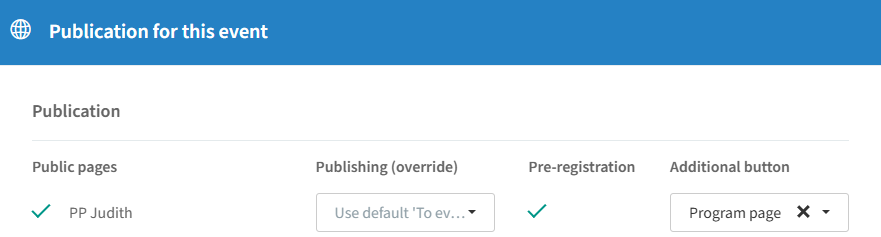
You can enable pre-registration if you have created a public page and published your event on this page. The form for the pre-registration is automatically generated and cannot be edited.
Create a public page if you don't have one yet (see "Create a Public Page" on the Public Pages page).
Go to Communication setup in your event dashboard.
Click Publication.
Select the public page on which you want to publish your event.
Check the Pre-registration checkbox.
Optional: add an additional button to an Extra page you have created in your event.
Click Save to apply the changes.
Note: in order to post your event on a public page, the registration page must be created and open (the registration period must not start in the future).
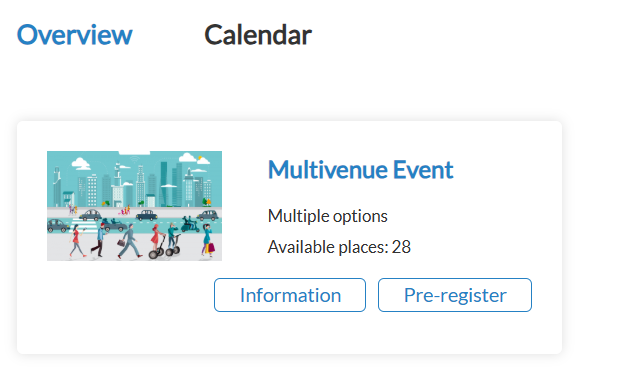
The pre-registration flow: after you set up pre-registration, your guests will be able to register via the public website. This is an example of how the event will appear there:
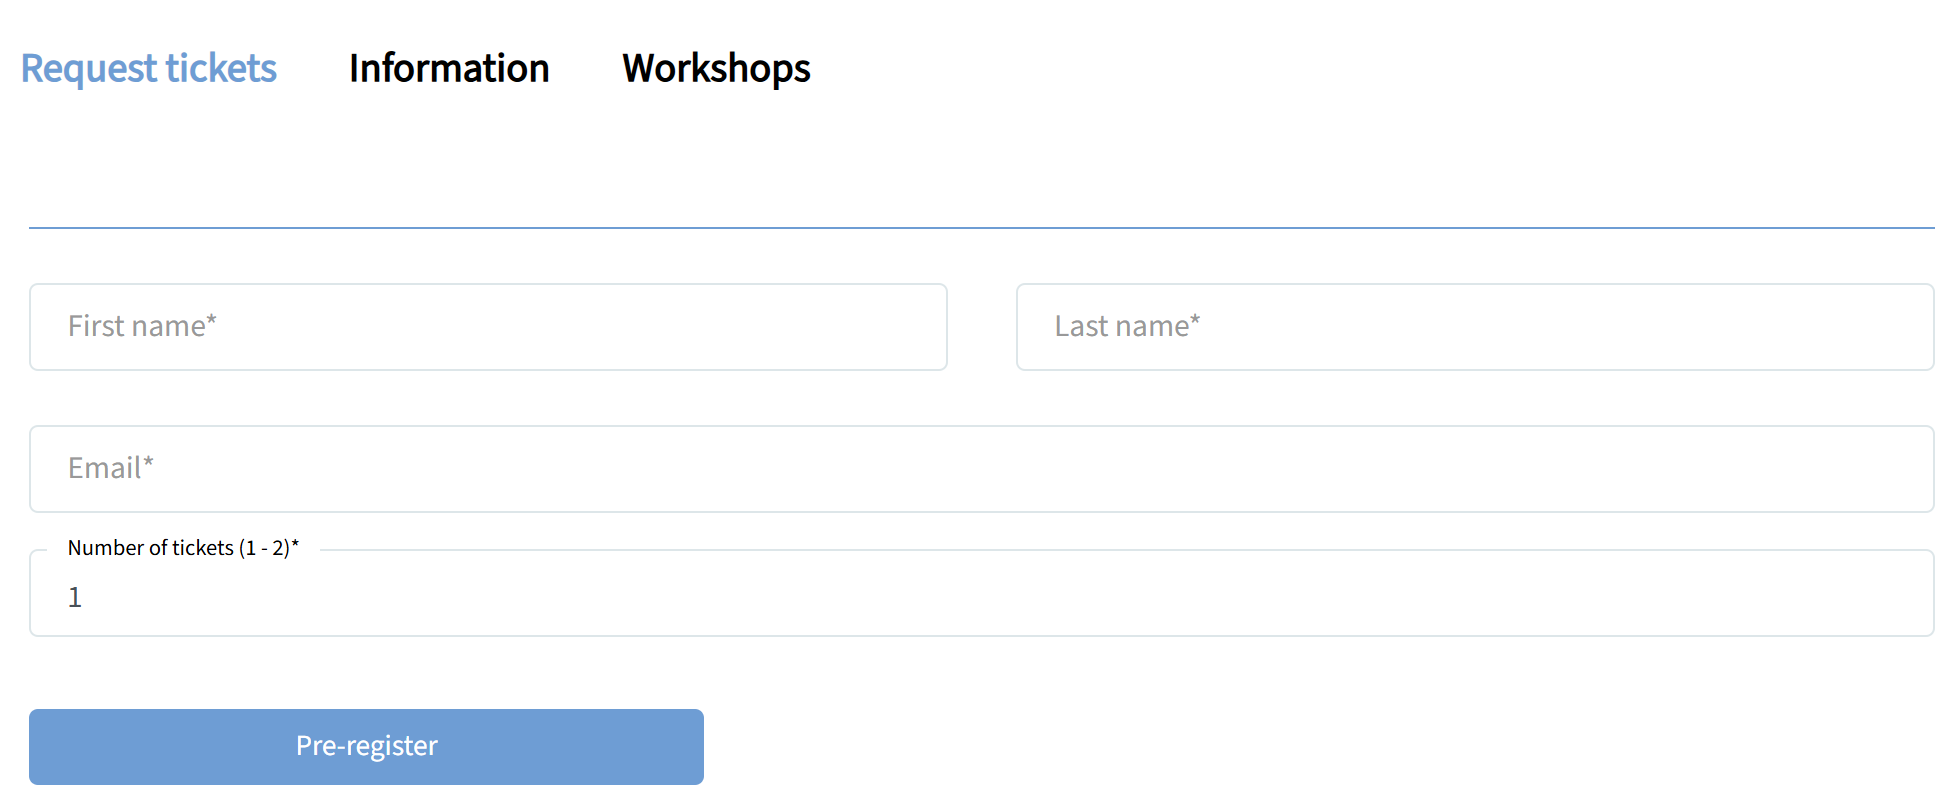
After they click on the Pre-register button, they will be able to fill in the pre-registration form. Individual fields cannot be customized, since all confirmed guests will also complete the usual registration form. The number of tickets they can request depends on your registration page settings.
Managing pre-registered guests: this is how a pre-registered guest appears on your invitee list. They will have the status "Waiting". By clicking on the red X, you can decline their pre-registration. After you cancel all the guests you don't want to accept in your event, you can send out the invitation email and follow the usual registration flow.
Tip: optionally, you can also create a new email with the target group "Declined" and send all declined guests an email too.

Since guests appear on the list as waiting, disable automatic invitation emails and send them manually after approval. You can do this as a bulk action for all waiting guests once you have finished checking the list. For more information on sending e-mails manually, check this article.
Advanced reports
You can export your invitee list and attendee list for a certain event (see the Invitation list and Attendee list pages). There is also a possibility to focus on long-term data. You can find the reports on the top bar (see the Reports page):

If you have access to the Platinum feature for extended reporting, you get an extended and more detailed overview and have the possibility to make a selection of which data you want to export. You will have two options available:

Advanced contact report
After clicking on "Contact report", you will see the following:
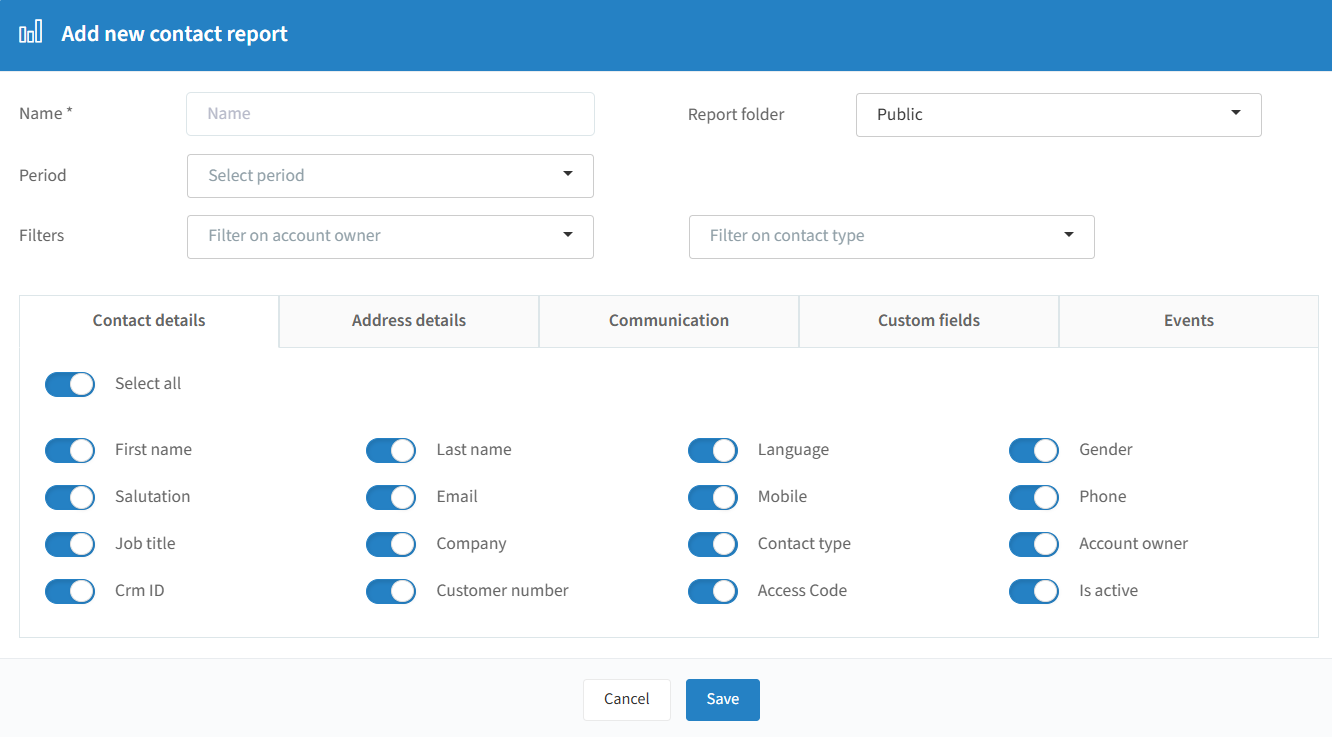
Name: choose a name for your report.
Report folder: choose the folder in which you want to save the report: public (visible for all users) or private (only visible to you).
Period: choose the period of the data you want to export.
Filters: apply a filter on account owner and/or on contact type (business relations or employees). This is optional and not mandatory.
Select the data you want to include in your report by activating the sliders and click "Save". You will be given the chosen information in an Excel file (some columns can be empty if this information is not available):
Contact details
First name: first name of the contact.
Last name: last name of the contact.
Language: last language of the contact.
Gender: gender of the contact.
Salutation: salutation of the contact.
Email: e-mail address of the contact.
Mobile: mobile number of the contact.
Phone: phone number of the contact.
Job title: job title of the contact.
Company: name of the company of the contact.
Contact type: employee or business relations.
Account owner: account owner of the contact.
CRM ID: CRM ID of the contact.
Customer number: customer number of the contact.
Access code: access code of the contact.
Is active: yes or no.
Address details
Addressline 1
Addressline 2
City
ZIP
Country
Communication
Event: contact's permission to receive communication from events.
Mailing campaign: contact's permission to receive mailing campaigns.
Sms permission: contact's permission to receive sms campaigns.
Custom fields
Contact custom fields you created will be available here (see the Custom contact fields page).
Events
Invitations: the number of invitations this contact has received.
Confirmed: the number of times this contact has confirmed an invitation.
Declined: the number of times this contact has declined an invitation.
Cancelled: the number of times the contact has cancelled a registration.
Expired: the number of times this contact didn't respond in time to an invitation.
Checked in: the number of times this contact checked in for an event.
No show: the number of times this contact didn't show up for an event after confirming the invitation.
Total costs: the total costs for this contact across all events.
Advanced invitation report
After clicking on "Invitation report", you will see the following:
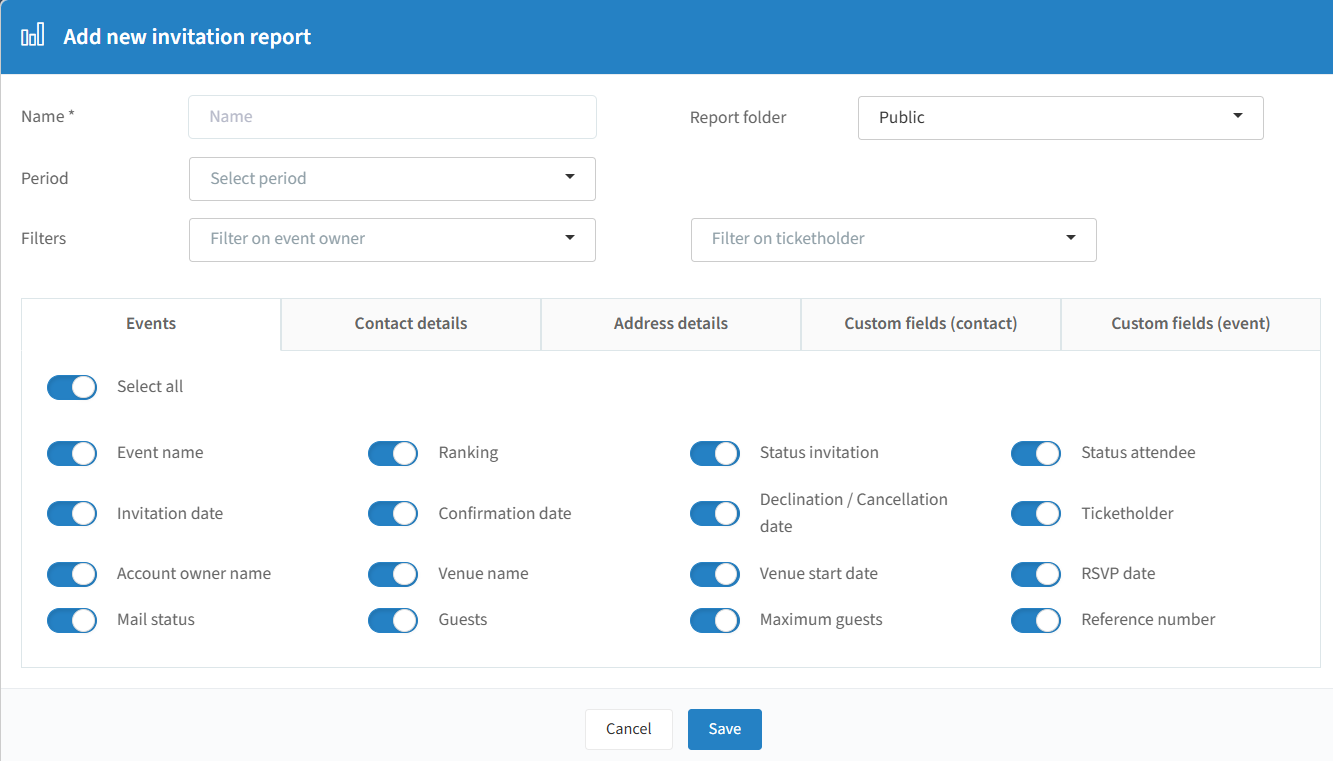
Name: choose a name for your report.
Report folder: choose the folder in which you want to save the report: public (visible for all users) or private (only visible to you).
Period: choose the period of the data you want to export. This is optional and not mandatory.
Filters: apply a filter on event owner and/or on ticketholder. This is optional and not mandatory.
Select the data you want to include in your report by activating the sliders and click "Save". You will be given the chosen information in an Excel file (some columns can be empty if this information is not available):
Events
Event name: name of the event.
Ranking: ranking of the guest in the invitation list.
Status invitation: status of the guest in the invitation list.
Status attendee: status of the guest in the attendee list.
Invitation date: when the invitation mail was sent.
Confirmation date: when the guest confirmed their registration.
Declination / cancellation date: when the guest declined their invitation or cancelled their registration.
Ticketholder: ticketholder name the guest is linked to.
Account owner name: account owner name the guest is linked to.
Venue name: name of the venue the guest is attending.
Venue start date: start date of the venue the guest is attending.
RSVP date: RSVP date for the guest.
Mail status: mail status of the guest.
Guests: total number of guests in the guests invitation.
Maximum guests: maximum guests per invitation in the event.
Reference number: reference number of the event.
Contact details
First name: first name of the contact.
Last name: last name of the contact.
Language: last language of the contact.
Gender: gender of the contact.
Salutation: salutation of the contact.
Email: e-mail address of the contact.
Mobile: mobile number of the contact.
Phone: phone number of the contact.
Job title: job title of the contact.
Company: name of the company of the contact.
Contact type: employee or business relations.
Account owner: account owner of the contact.
CRM ID: CRM ID of the contact.
Customer number: customer number of the contact.
Access code: access code of the contact.
Is active: yes or no.
Address details
Addressline 1
Addressline 2
City
ZIP
Country
Custom fields (contact)
Contact custom fields you created will be available here (see the Custom contact fields page).
Custom fields (event)
Event custom fields you created will be available here (see the Custom event fields page).
Custom calendar description
After you have created your event, you will find the communication setup of your event on the right-hand side (see the Communication setup page).
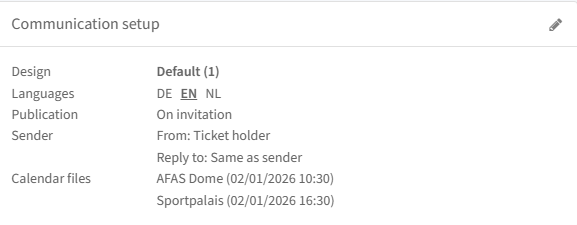
Calendar files: if you have this feature, it will also be shown in the communication section.

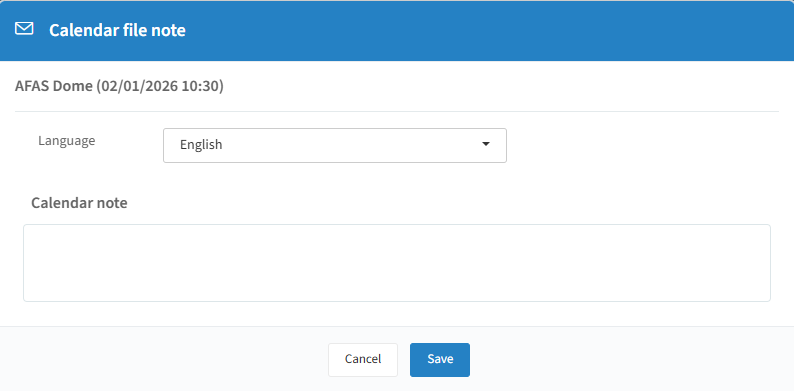
It enables you to customize a part of your calendar files with extra text. When attendees download the calendar file to add to their agenda, they will see your personalized text in the note to the event.