
Tickets
On this page:
Ticket (Venue or specific access right)
In just a few steps, you create your own event. In this section, we will focus on how you can automatically create a QR-code ticket for your selected venue or specific access right*. *Please note that scanning-specific access rights is only available on the Scanapp.
For more information about the creation of an event, see "Event data & information" on the Create an event page.
Activate the (venue) ticket
When you are creating your event and you are defining the date and location, you can activate a slider to automatically generate a QR-code ticket (see "Event data & information" on the Create an event page).
By doing so, the tickets will be automatically activated to be sent in your confirmation mail. You can always deactivate the "Tickets" button in the design of your mail if you don't want this (see "Mails overview" on the Event communication page).
This QR-code ticket will now be available in the "event" app where the attendee can access his or her tickets. Below is an example:
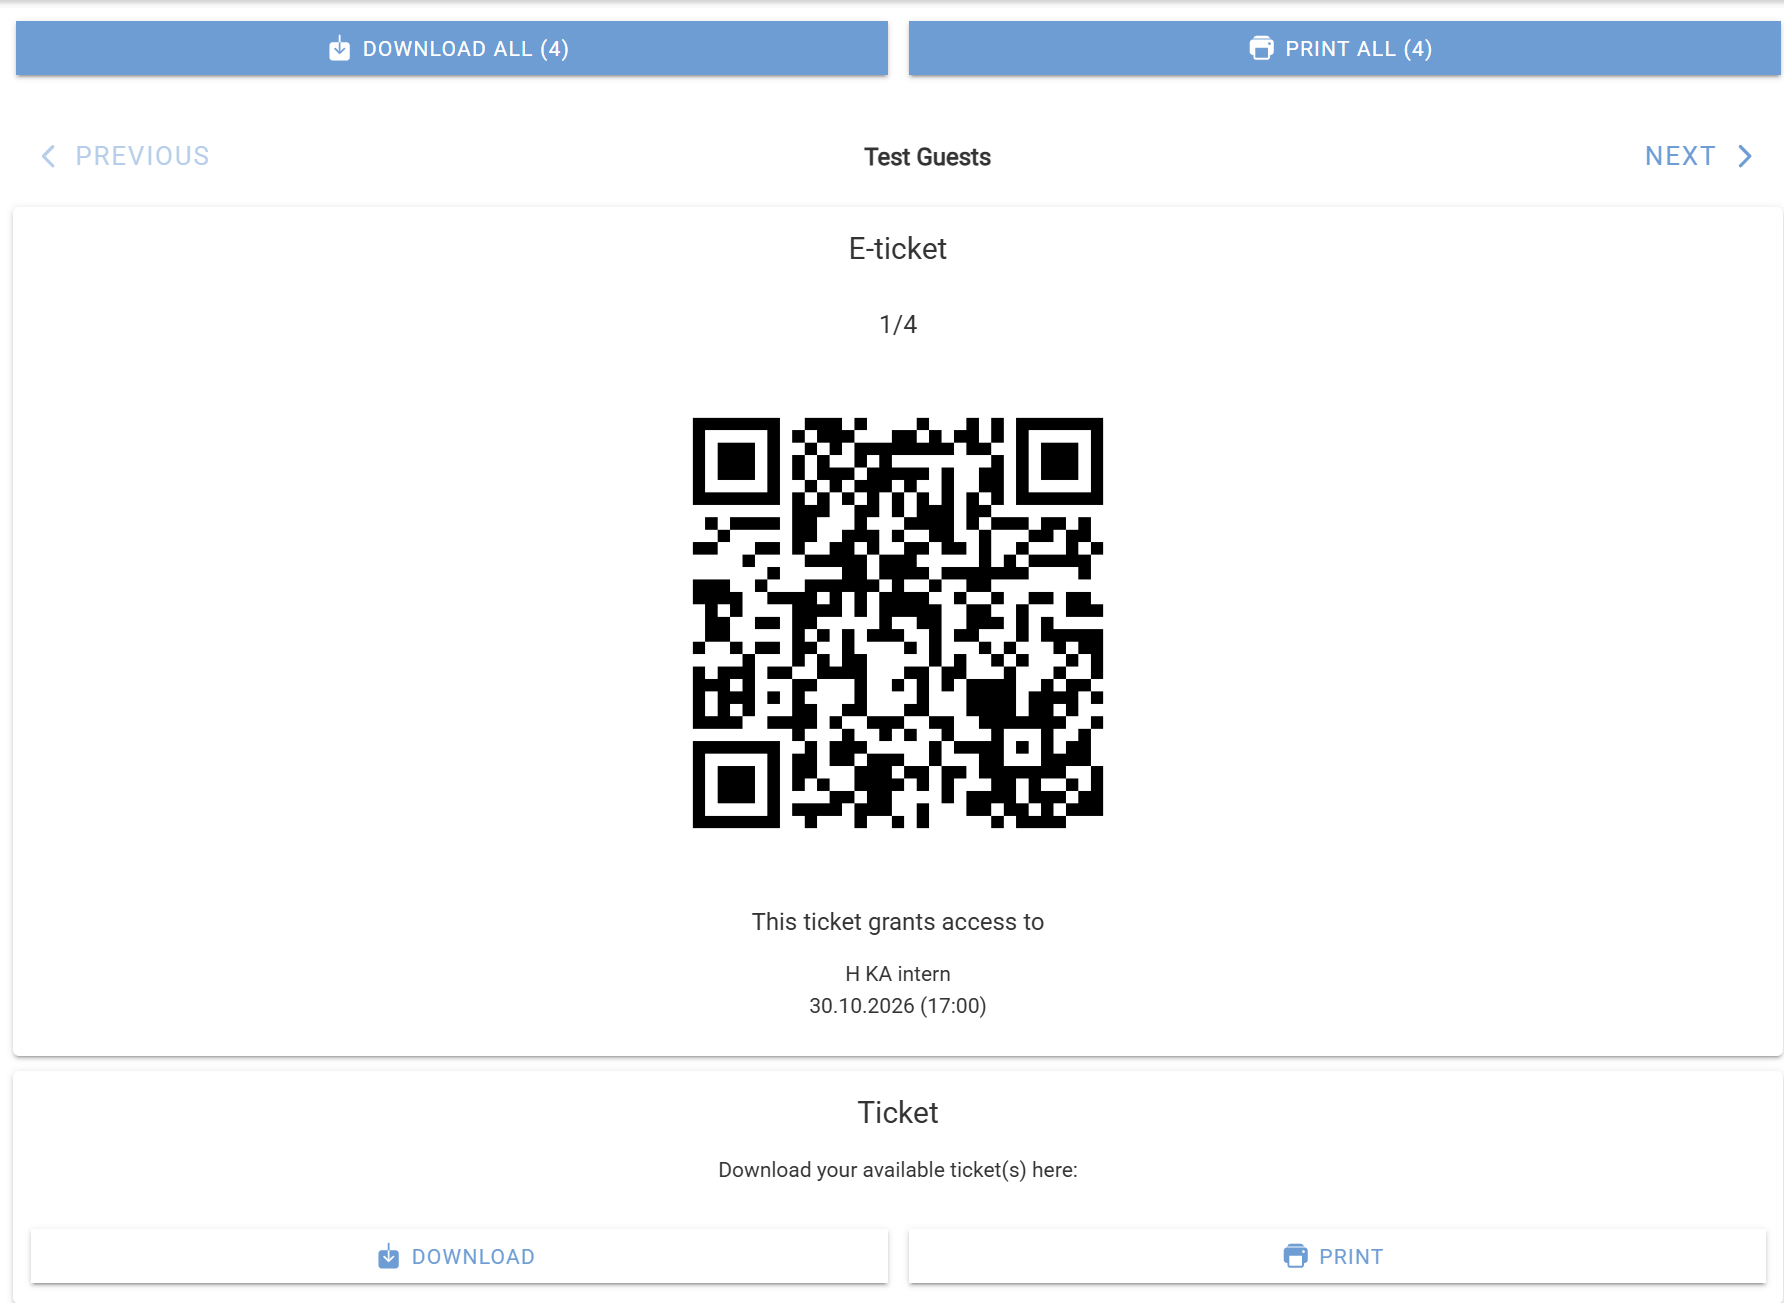
Activate a ticket (access right) for a specific answer in the registration form
When you are creating your registration page and you are adding questions, you can edit your question and add "Ticket access rights" (see "Registration page questions" on the Event website page). By doing so, the QR-code ticket for the specific attendee will be linked to the selected answer from the registration page.
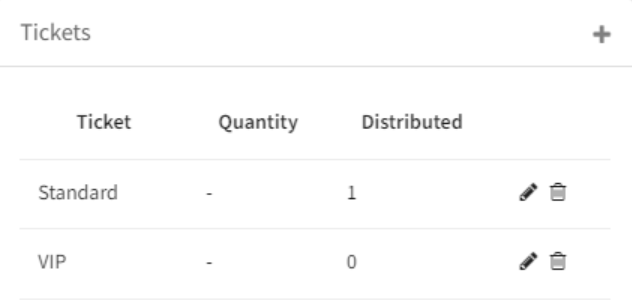
Your created "Ticket access rights", will be visible in the "Tickets" section:
Activate a ticket (access right) by manually creating it in the "Tickets" section
In the "Tickets" section at the bottom right-hand side of your event, you can add a "Ticket access right" by clicking on the "+" sign:

By doing so, you will have the following options:
Name: give your ticket access right a name.
Distribution type: determine the type of distribution for this ticket access right:
Assign automatically to all guests
Assign automatically only to the main guest
Manual assignment
Click on "Save" to create your ticket access right.
Consult your scanning report in the "Tickets" section
In the "Ticket list" section, you can consult your scanning report by clicking on the "clock" icon:
Click on "Export" to consult your scanning report.

Create pdf ticket
With InviteDesk you can quickly and easily create your own tickets with a QR code. In the Ticket module on the event dashboard click on the plus sign and select "Create PDF ticket".
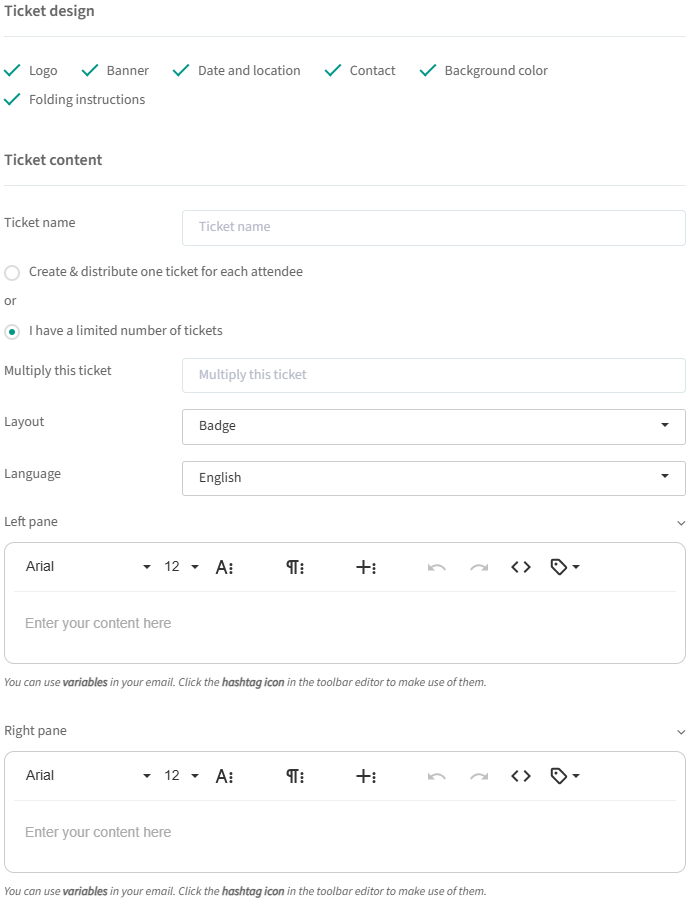
Here are a few guidelines:
Ticket name: this name ensures that when you distribute, you immediately know which tickets you are going to distribute if you have several types of tickets for an event. Your invitees will also see this name on the download page.
Create and distribute one ticket for each attendee: as soon as someone registers, the system creates a ticket for the new attendee and the ticket is already allocated. You can decide to manually send these tickets by using the ticket mail or immediately include them in for example your confirmation mail.
I have a limited number of tickets: it's possible that not every attendee should get a certain ticket (e.g. a parking ticket). In this case, select this option and enter the number of tickets you wish to create in an additional field that will appear. The allocation of these tickets to guests is always done manually (see "Ticket list: distribute tickets" below).
Layout: you can choose for a badge layout or A4. The badge layout ensures that a guest at the event itself can fold their ticket and have a badge with their name. It is best to provide a plastic holder on a lanyard where they can insert the badge.
2 text editors (Left pane and Right pane): these allow you to add content. The usage of variables makes personalisation possible.
The left pane can be used as a badge by adding the first name and last name variables.
The right pane (Only available when layout "Badge" is selected) is typically used for practical information or to display the program.
Preview Ticket: at the top of the page there is a preview button that will generate a PDF so you can perfectly see how your guest will receive the tickets.
Upload pdf ticket
Upload third-party tickets*
When you already have existing tickets there are 2 possible scenarios: you have several unique tickets (e.g. soccer, concert) or you have one ticket that is the same for everyone (e.g. parking ticket). For both cases, you start at the same point. In the Ticket module on the event dashboard, select "Upload PDF" under tickets:
Uploading many tickets: Once you have clicked on upload, you can upload the files at once by browsing or dragging them in. When you have uploaded the files you can see them immediately in the preview section. The arrows allow you to navigate between the different files. The "+" and "-" in the upper right corner allow you to add or remove specific tickets. The delete button removes all tickets at once.
Upload a ticket that is the same for everyone: When you upload only 1 file, the field "Multiply this ticket" appears on the right side. This determines how many times the same ticket will be created so you can distribute it to your attendees the same number of times.
Distribution: you will have the choice between assigning one ticket automatically for each attendee or assigning the tickets manually (see "Ticket list: distribute tickets" below).
*Attention: if you upload encrypted or secured third-party tickets, the guest will not be able to perform the "Download all" action on the tickets landing page. Then the guest will have to download the tickets separately.
Tickets with an access code
In this section, we will talk about the possibility to distribute tickets with an access code so that your guests can download the tickets on a third-party website. In some cases, you just get a list of codes from an event partner which you need to forward to your guests. We provide you with an easy solution to upload and distribute them in one click. In the Ticket module on the event dashboard, select "Upload Access code" under tickets:
Upload a list of codes with an Excel file: For this you just need to have all the codes in an Excel file, meaning just 1 column with all the codes.
Add an access code manually: This can be useful if you just have one code that is the same for all of your guests. You enter the access code manually and define the quantity. Defining your quantity is important because you will only be able to distribute as many codes as you define here.
Ticket name: this name ensures that when you distribute, you immediately know which tickets you are going to distribute if you have several types of tickets for an event. Your invitees will also see this name on the download page.
Distribution: you will have the choice between assigning one access code automatically for each attendee or assigning the access codes manually (see "Ticket list: distribute tickets" below).
Link to the ticket download page: here you can provide the URL of the partner website on which your guests can download the ticket. You also have the possibility to define if the same URL will be used for all languages or if it will be a different URL per language.
Experience for your guest: when your guests clicking on the tickets button in received in their emails:
Tickets with pick up point
In this section, we will talk about the possibility of easily communicating about picking up your ticket at a physical location. In the Ticket module on the event dashboard click on the plus sign and select "Ticket pick up point". You will see the following:
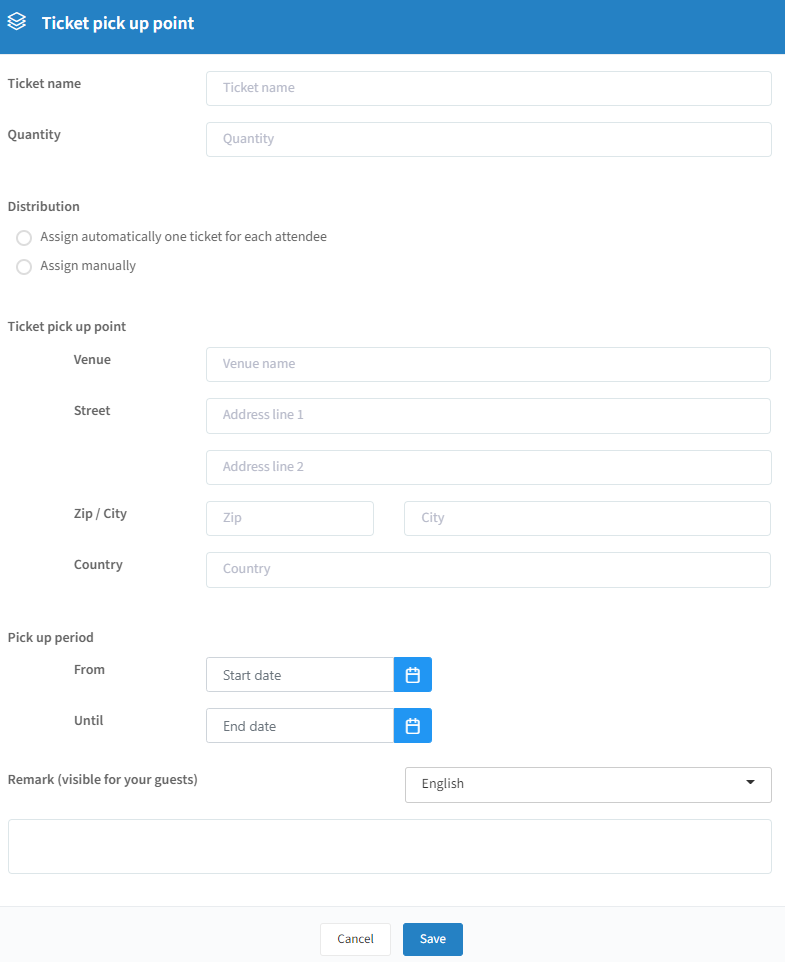
Ticket name: this name ensures that when you distribute, you immediately know which tickets you are going to distribute if you have several types of tickets for an event. Your invitees will also see this name on the download page.
Quantity: define the number of tickets you have that will be available to pick up.
Distribution: you will have the choice between assigning one access code automatically for each attendee or assigning the access codes manually (see "Ticket list: distribute tickets" below).
Ticket pick up point: define the address where your guests can pick up their tickets.
Pick up period: define the period when your guests can pick up their tickets.
Remark: add a remark that will be visible to your guests. For example, a notification that they will need to show their identity card when they come to pick up the tickets.
Experience for your guest: when your guest receives your created mail to download their tickets, they will see the following by clicking on it:
Ticket list: distribute tickets
Except for the tickets you created with the option "Create and distribute one ticket for each attendee", the tickets still need to be distributed. This can be done per guest or all at once for many guests. You can find the "Ticket List" next to the "Invitation list" and the "Attendee list".

Once you click the pencil icon on the right-hand side, you'll first need to select the ticket you want to distribute in the upper-right corner.
You can then assign the selected ticket to the chosen attendee.
Tip: You can also select multiple attendees first and then click the pencil icon. This allows you to distribute tickets to several guests at once, as they will all appear in the ticket distribution list.

Filters
You can apply the following filters:
Filter on venue: here you can apply a filter to search for attendees by venue.
Filter on ticket: select the ticket you wish to distribute.
Filter on guests: here you can choose between all guests or main invitee only.
Filter on ticket holder: here you can apply a filter to search for attendees by ticket holders (see the Ticket holders page for more details).
Filter on tickets: here you can filter the number of tickets that are distributed per contact.
Filter on segment: here you can filter to search for attendees that belong to a specific segment.
Actions
You can do the following actions:
Search for attendees: in this free text field, you can search for an attendee by typing for example his or her name.
Sorting columns: by clicking a column you can apply sorting for that specific column.
Adding tickets to an attendee: the plus sign next to a name allows you to distribute a ticket to your guest. You can also use the checkboxes on the left to distribute tickets to multiple guests at once.
Removing tickets for an attendee: the minus sign next to a name allows you to remove a singular ticket for that attendee. With the trashcan icon, you can remove multiple tickets at once.
Tips:
The tickets that have already been assigned will have a red frame in the preview on the right side.
When you move your cursor over the preview of the tickets, there is an automatic zoom so you can read the small print - e.g. seat numbers.
Ticket list: filters & actions
You can find the "Ticket List" next to the "Invitation list" and the "Attendee list".
Filters
You can apply the following filters:
Filter on ticket: here you can apply a filter to only see the attendees with a specific ticket.
Filter on ticket holder: here you can apply a filter to search for attendees by ticket holders (see the Ticket holders page for more details).
Filter on status: here you can apply a filter to search for the status of an attendee linked to ticket distribution / sent ticket mail:
Assigned
Sent
Updated
Assigned / Updated
Filter on venue: here you can apply a filter to search for attendees by venue.
Filter by segment: here you can apply a filter to search for attendees that belong to a specific segment.
Actions (Basic)
You can do the following actions:
Search for attendees: in this free text field, you can search for an attendee by typing for example his or her name.
Sorting columns: by clicking a column you can apply sorting for that specific column.
Actions (Advanced)
Next to every attendee, you will see different action buttons in the last column:
The "pencil" icon: by clicking this, you will go to the distribution of tickets section (see "Ticket list: distribute tickets" above).
The "envelope" icon: here you can (re)send the ticket mail to the selected attendee.
The "printer" icon: here you can manually print the ticket(s) for an attendee.
You also have the possibility to select multiple attendees at once by clicking on the checkbox(es) on the left-hand side. You will be able to do the following:
Send ticket mail: here you can (re)send the ticket mail to the selected attendee(s).
Edit ticket list: If you click on the pencil, you will be able to (re)distribute your tickets if needed (see "Ticket list: distribute tickets" above).
And finally, you will also have different additional options available on the top right-hand side:
Refresh: you can refresh the list.
Edit ticket list: If you click on the pencil on the right-hand side, you will be able to (re)distribute your tickets if needed (see "Ticket list: distribute tickets" above).
Tip: It's not mandatory to use the tickets mail to send out your tickets. You can for example immediately add them to your confirmation mail. Activate the checkbox "Tickets" in your e-mail design, of for example the confirmation mail, to do so (see "Confirmation" on the Event communication page).