
Invitation list
On this page:
Invitation list: Filters & actions
When your communication campaign is running, you can follow up and manage your invitation list. When you are on the dashboard of your event, you can find the invitation list here:

Filters
You can apply the following filters:
Filter on account owner: here you can apply a filter to search for invitees by account owners.
Filter on ticket holder: here you can apply a filter to search for invitees by ticket holders (see the Ticket holders page for more details).
Filter by contact type: here you can apply a filter to search for invitees by type:
Employees
Business relations
Filter on status: here you can apply a filter to search for the status of an invitation:
Confirmed: The number of guests who have registered.
Pending: The number of guests who have received their invitation, but we are waiting for their answer.
Waiting: The number of guests who are added to the invitation list but haven't received an invitation mail yet. This can relate to different possibilities. For example, you have a limited number of places available.
Declined: Guests that explicitely declined their invitation.
Expired: Guests whose invitations have expired. Click here to read about How to manage expired invitations.
Filter on mail status: here you can apply a filter to search for invitees by mail status:
Sent
Opened
Clicked
Bounced
Spam
Blocked
(See "Mail statistics" on the Event dashboard page for more details.)
Filter by segment: here you can apply a filter to search for invitees that belong to a specific segment.
Tip: your applied filters, besides the free text field, will be saved the next time you will visit your list.
Actions (Basic)
You can do the following actions:
Search for invitees: in this free text field, you can search for an invitee by typing for example his or her name.
Sorting columns: by clicking a column you can apply sorting for that specific column. By clicking it a third time, it will restore to default.
Actions (Advanced)
Next to every invitee, you will see different action buttons in the last column depending on the status of their invitation:
The "i": here you can find several useful info including "Past Events" and which type of mails the invitee has already received concerning this event. You can also see if this invitee belongs to a Main invitee segment or an extra guest segment.
The "pencil" icons: here you can manually edit the ticket holder, the maximum number of guests and, if needed, change the registration details of an invitee. You can also edit the segment membership here. If you change the registration details of an invitee, you can choose to send a new confirmation mail if needed.
The "envelope" icon: here you can re(send) a specific mail to the selected invitee.
The "confirm and decline" icons: here you can manually confirm or decline the invitation for an invitee.
The "trashcan" icon: here you can delete this invitee from the invitation list. You will only see this when the invitee is in "Waiting", "Declined" or "Expired" status.
You also have the possibility to select multiple invitees at once by clicking on the checkbox(es) on the left-hand side. Depending on the status of the invitation of the invitees, you will be able to do the following:
Send mail: here you can re(send) a specific mail to the selected invitee(s).
Remove: remove the invitees from the invitation list. Only possible if they are in "Waiting", "Declined" or "Expired" status.
Decline: decline the invitation for the selected invitee(s).
Edit: with this action, you can overwrite the Ticketholder and change the maximum number of guests for the selected invitee(s). You can also edit the segment membership of multiple invitees at once in this section.
And finally, you will also have different additional options available on the top right-hand side:
Segment: here you can create a segment for your invitees.
Refresh: you can refresh the list.
View activities: by clicking the clock icon, you can view the activities of users in the system. This is only visible for admin users. Please contact your contact at InviteDesk for more details.
Export: you can export your invitation list. In the following screen, you can give your excel file a name and determine which data you want to export. (See "Export invitation list" below for more details.)
Print: you can print your invitation list.
Shuffle: you can shuffle your invitation list. Only possible when the invitees are in "Waiting" status, meaning no one has received the invitation mail.
Add invitees to the list: you will have several possibilities to add invitees to the list — via the Address book, as a New contact, via Excel, HubSpot or Marketo. Each option is described in its own section below.
Add invitees (Address book)
By clicking on the "+" sign on the right-hand side of your invitation list, choose "Address book":
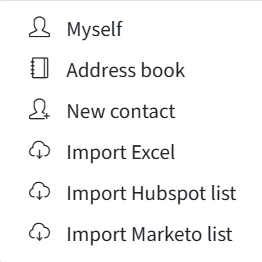
You will see the following:
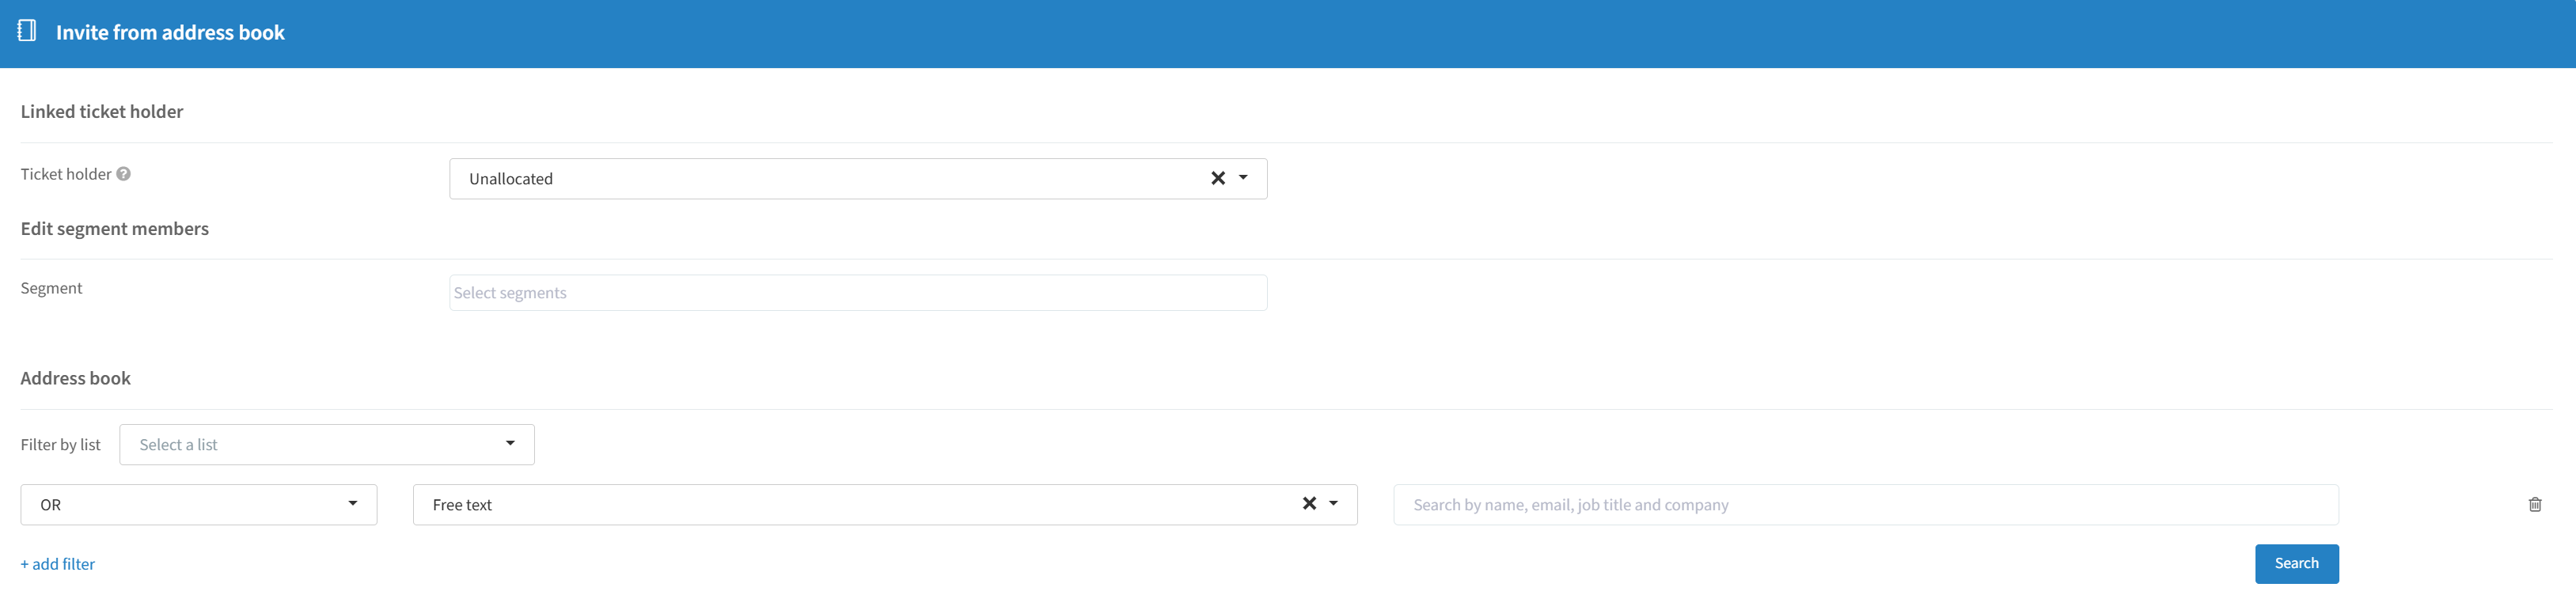
Linked ticket holder: you can link the selected invitee(s) to a ticket holder if needed.
Edit segment members: you can add the selected contacts to a segment you have created (see "Invitation list: Filters & actions" above).
Filter by a specific list — see "Public lists" and "My lists" on the Address Book page.
You can apply several filters to search for your contacts.
When you have selected the contacts you need, you click on "Add" at the bottom. These contacts will now be on your invitation list.
Tip: you can always add yourself to the invitation list to, for example, test all the communication mails.
Add invitees (New contact)
By clicking on the "+" sign on the right-hand side of your invitation list, choose "New contact":
You will see the following:
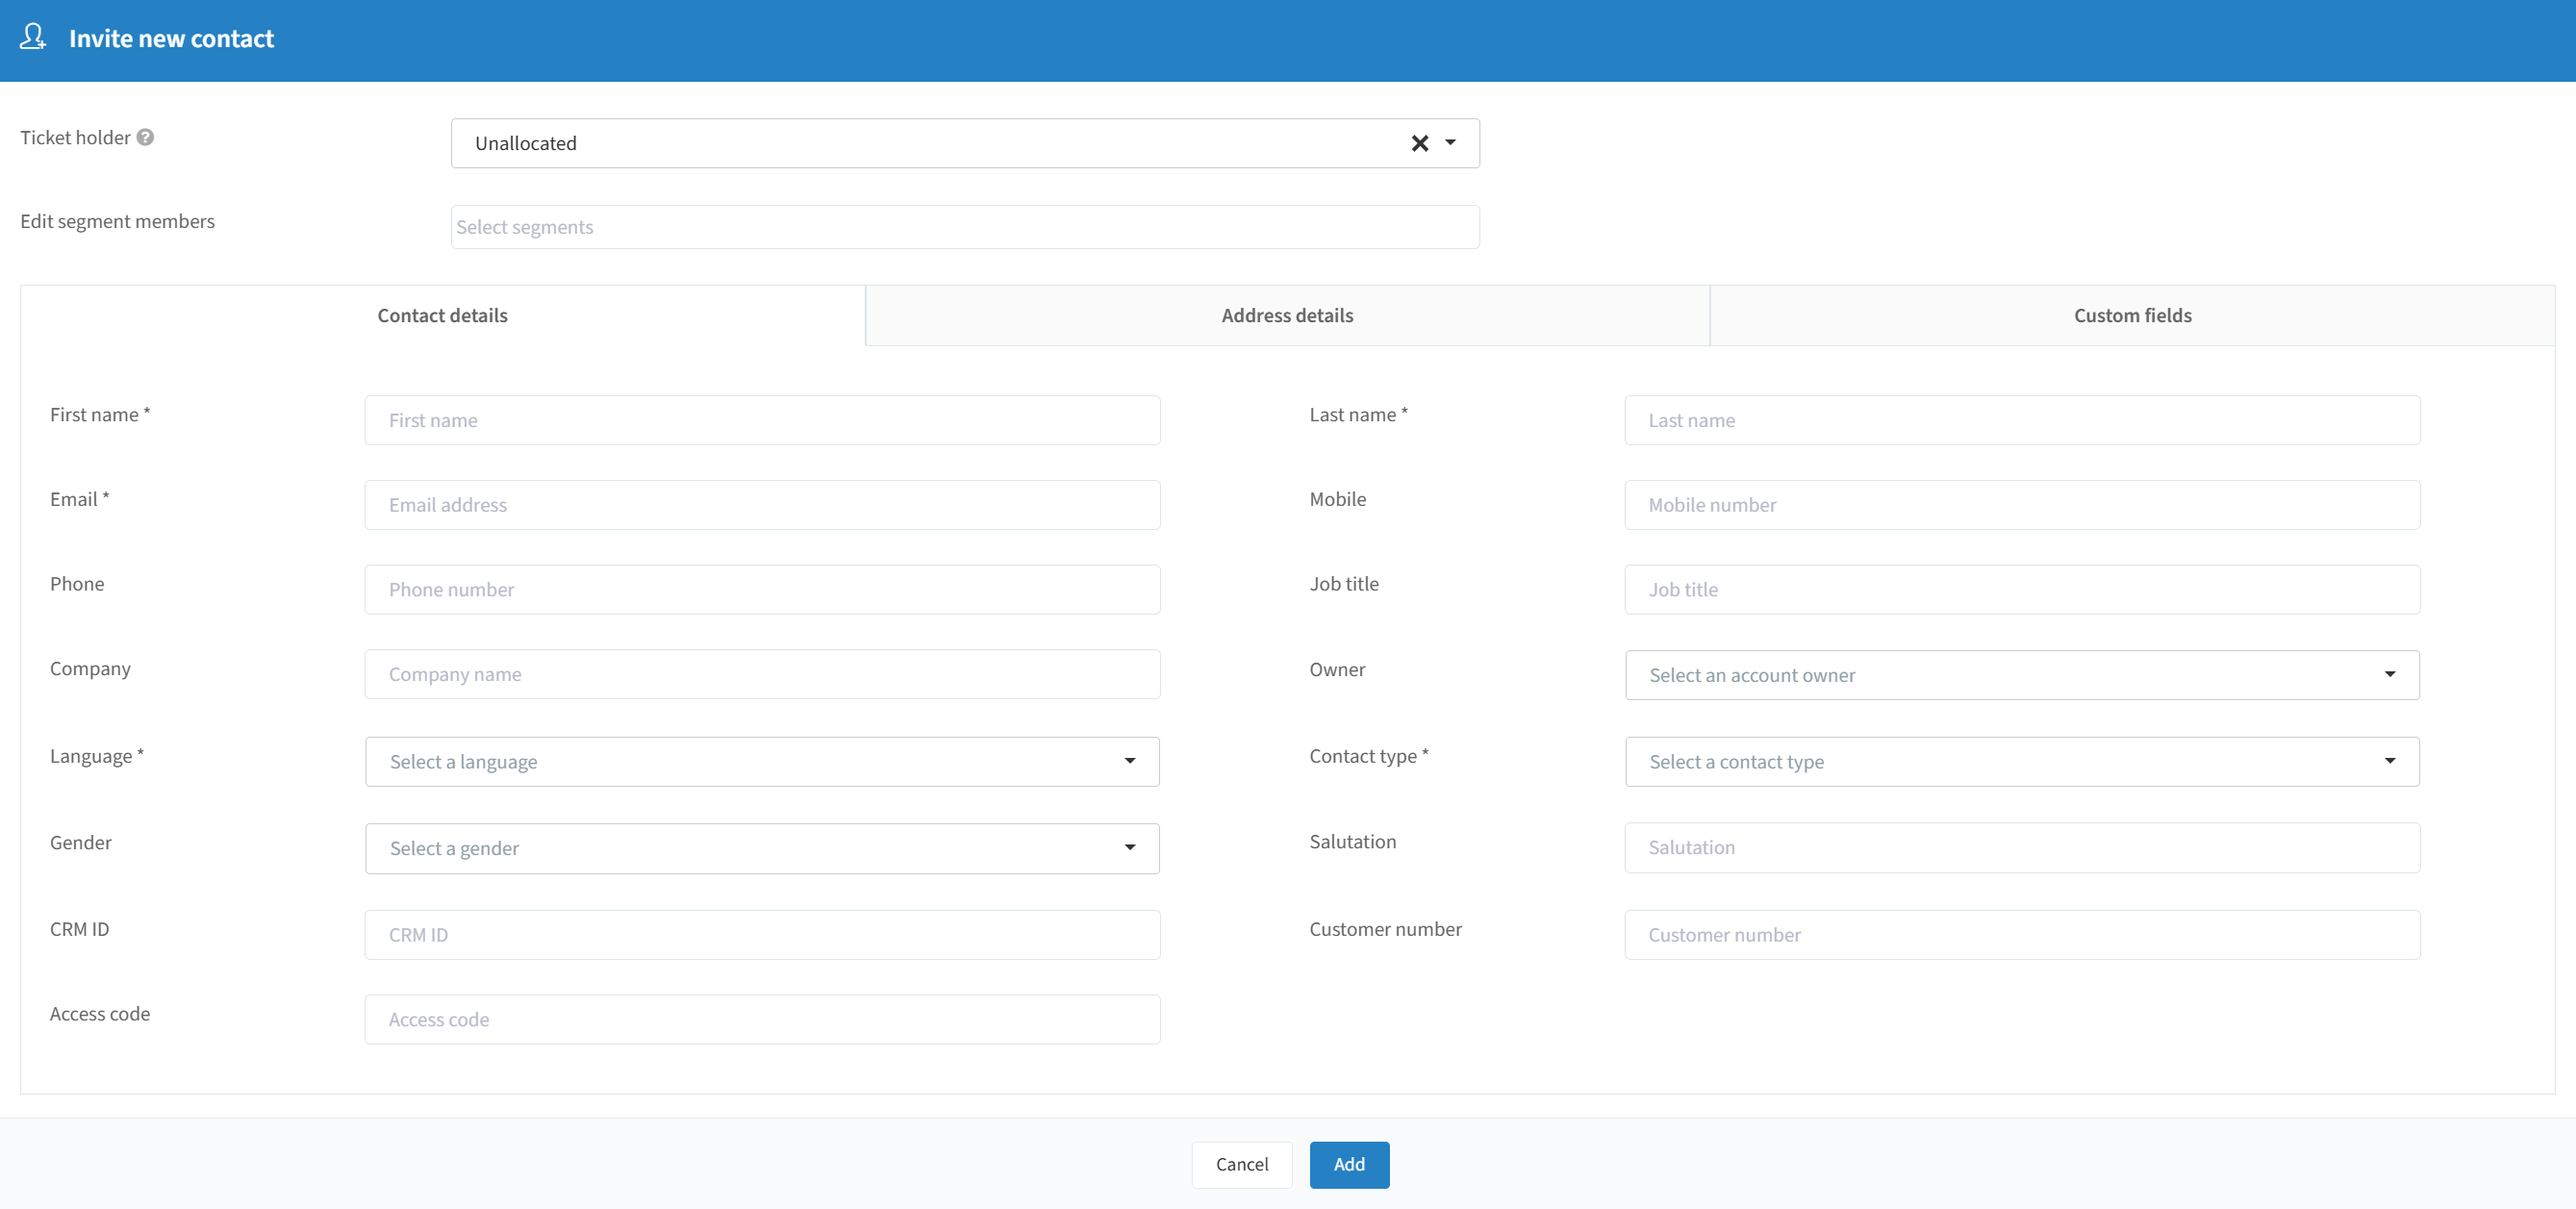
Linked ticket holder: you can link the new contact to a ticket holder if needed.
Fill in the details with as a bare minimum the mandatory fields marked with *.
When you have done the steps above, you can click on "Add" at the bottom. This new contact will now be on your invitation list.
Add invitees (Excel)
By clicking on the "+" sign on the right-hand side of your invitation list, choose "Import Excel":
The system will take you through an easy-to-understand wizard:
Upload:
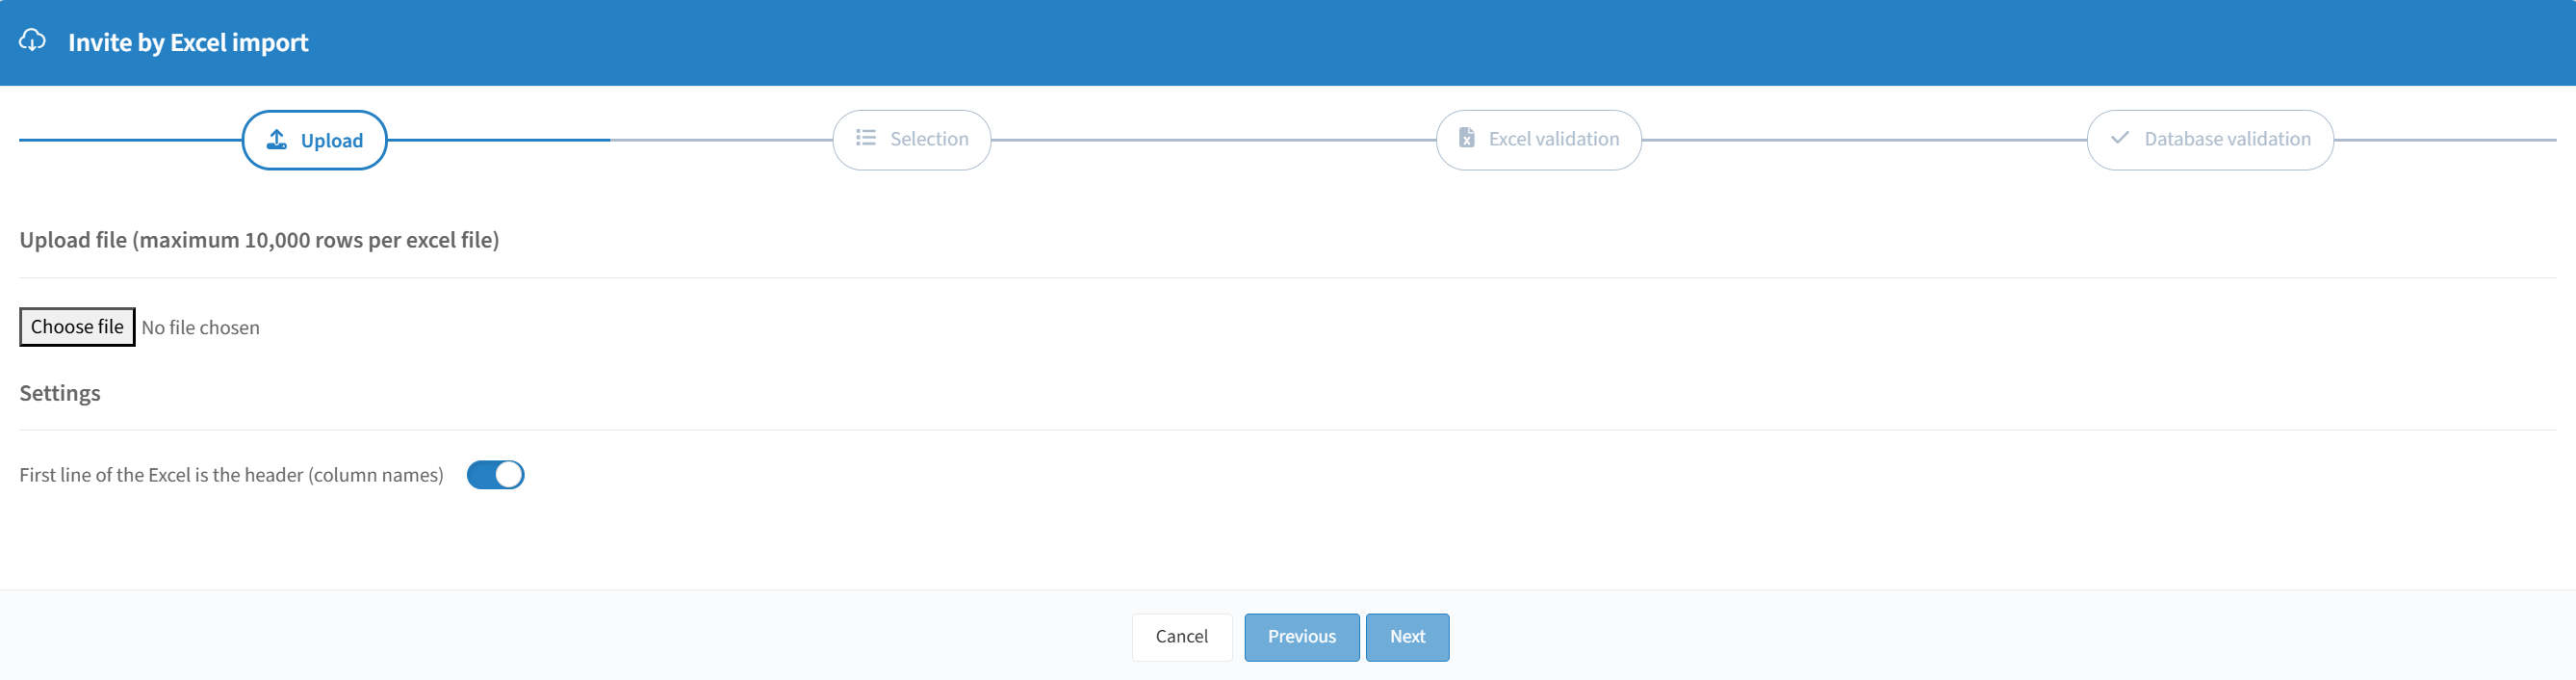
Choose your file (Maximum of 10.000 rows for each Excel file) and determine if the first line of your Excel file is just data or the title of your column names.
Selection:
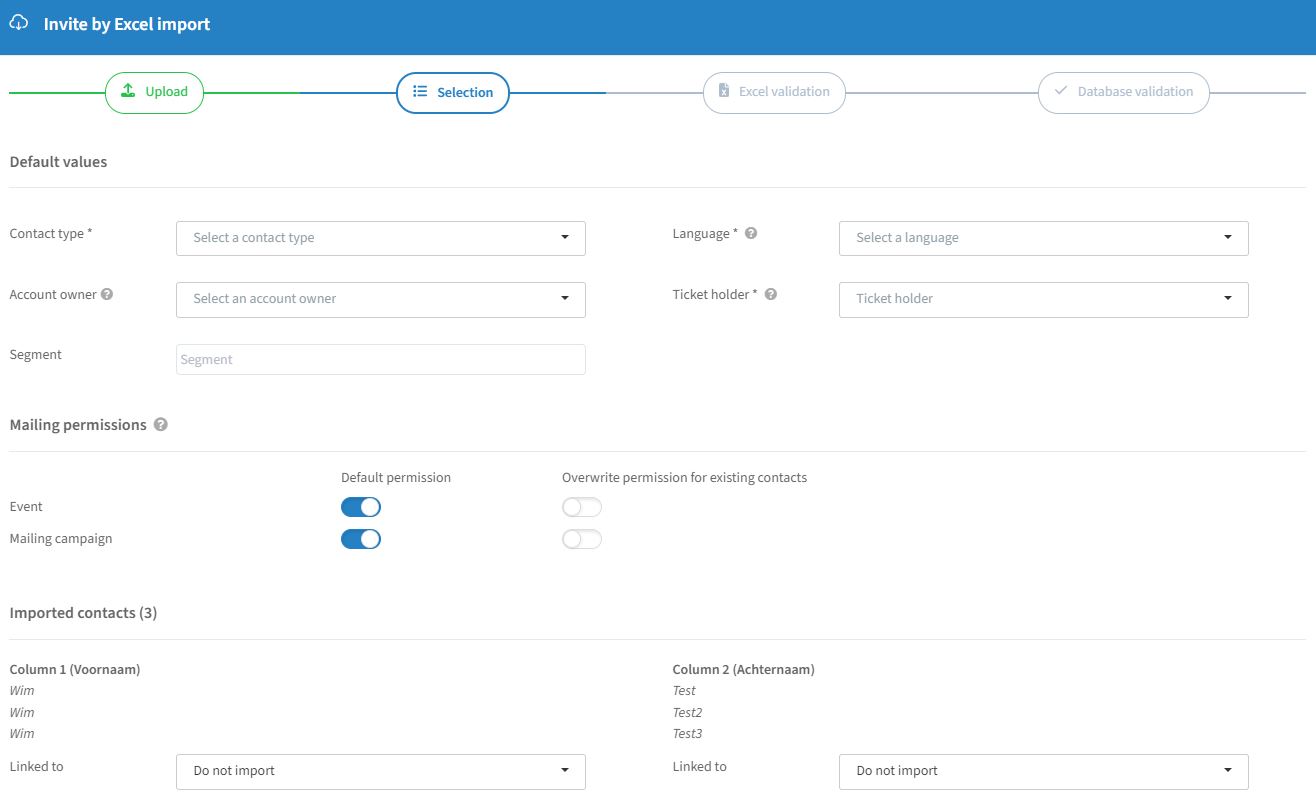
In this next step you will determine the following:
Contact type: choose between "Employees" or "Business relations".
Language: select the default communication language for your contacts, in case this value is not present in your Excel file as a separate column.
Account owner: select the account owner that will be linked to the imported contacts.
Ticket holder: link a ticket holder to the uploaded invitees. You can leave this empty if you have a column with the mail address of the ticket holder in your Excel file. That way you can upload your whole list in one go and all invitees will be linked with the correct ticket holder.
Segment: you can add the contacts to a segment you have created (see "Invitation list: Filters & actions" above).
Mailing permissions: select the default mailing permissions for your contacts, in case this permission does not exist in your file. If you would upload existing contacts, and you wish to apply the default permission to all these contacts, please activate the right slider as well. Note: this will overwrite the permission that already exists in the address book.
Imported contacts: identify data of your Excel file. Here you will determine the data of your columns and map it with the appropriate data field. Mail of your invitee is mandatory. You can always decide to not import specific columns.
Excel validation:
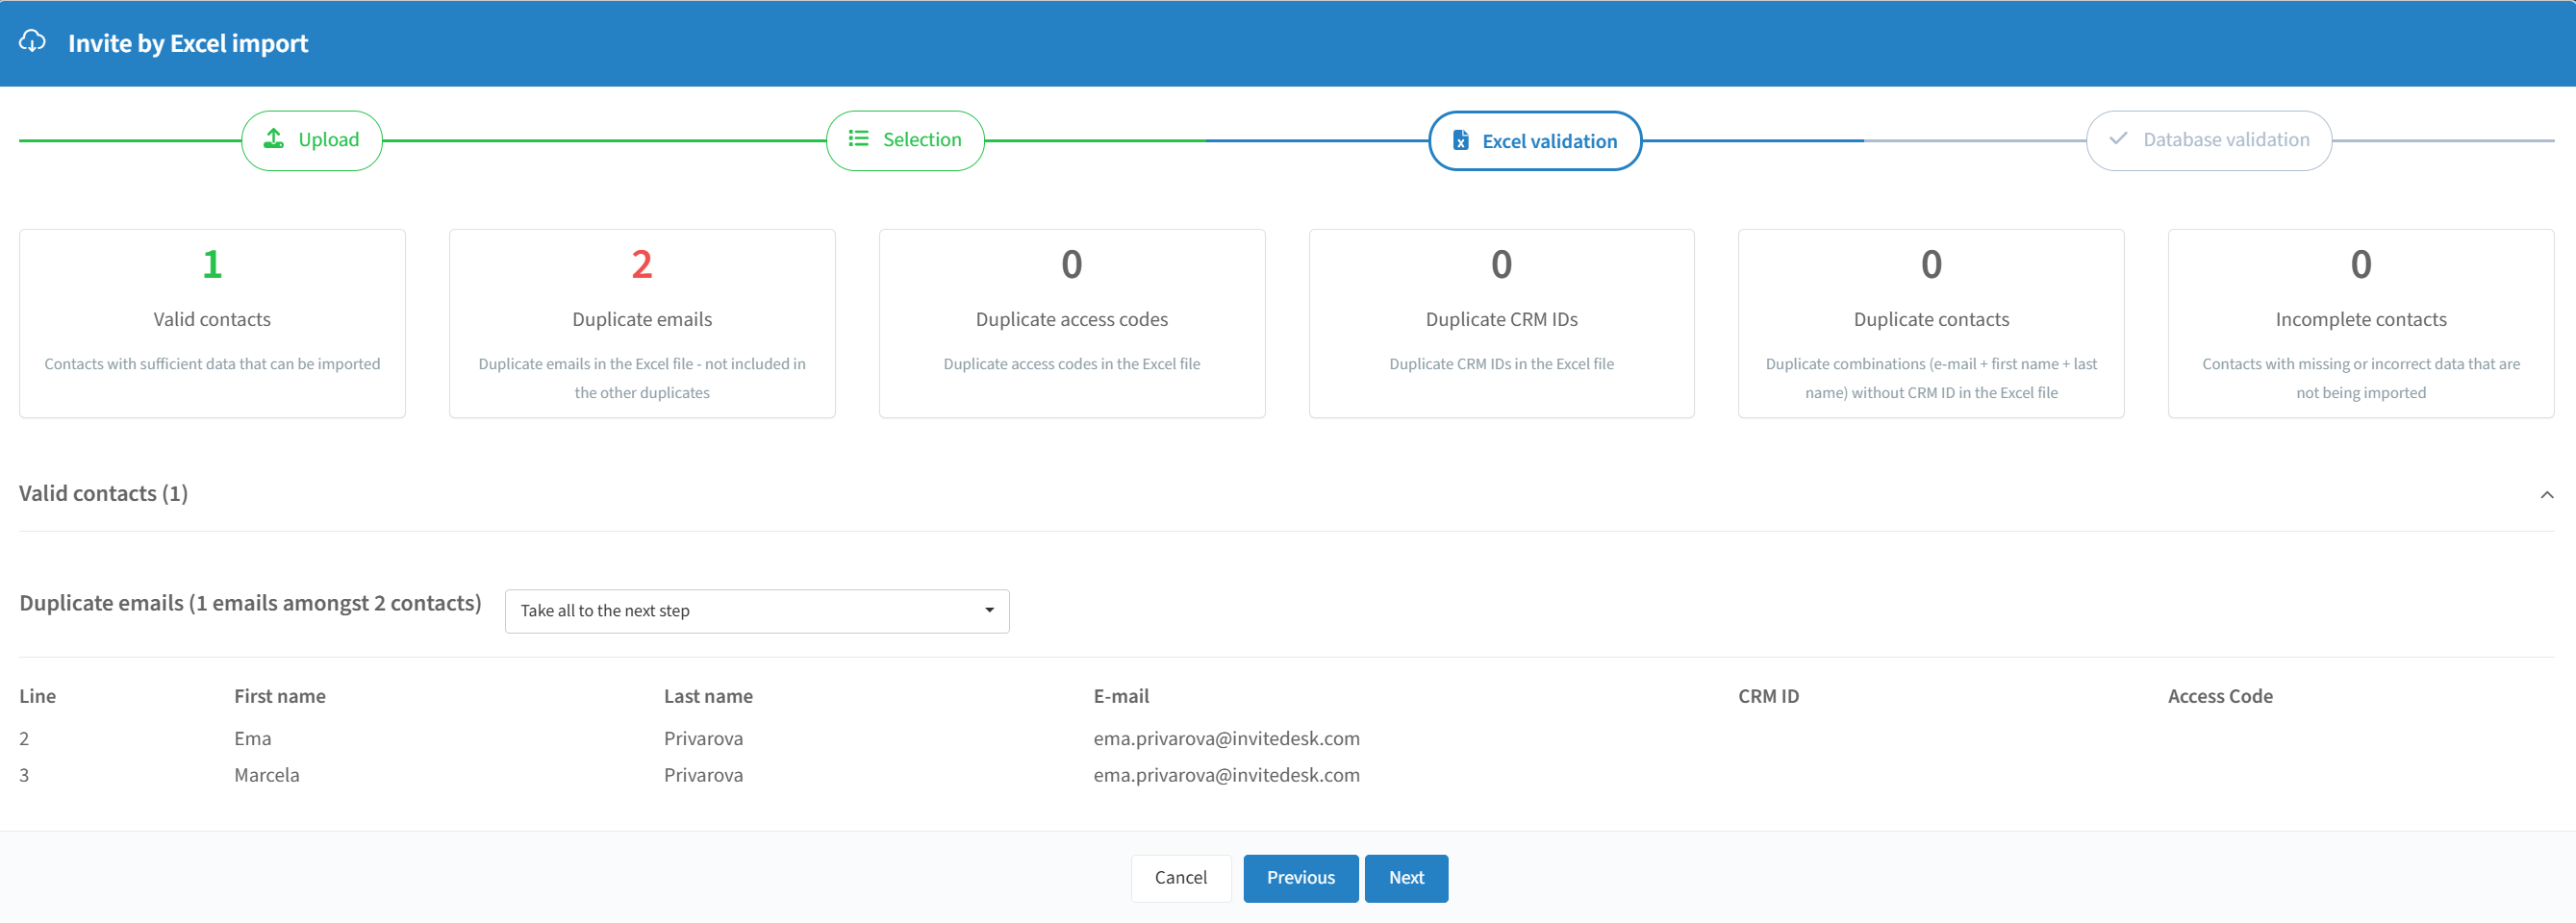
In this step, the wizard will determine how many valid contacts there are present in the Excel file. We will indicate which contacts are duplicates or contain incomplete data. If this is the case, you can decide what to do with these contacts or see what is wrong, for example, "E-mail is empty".
For duplicates, you can choose to import only the first or both.
Database validation:
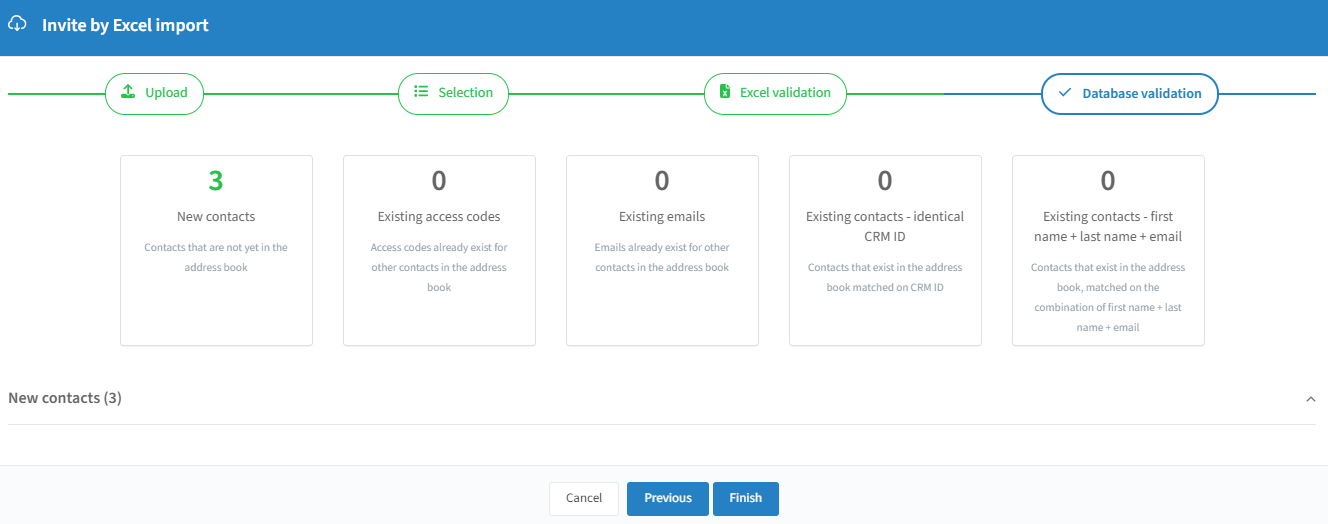
In the fourth and final step, the wizard will determine how many new contacts there are in the Excel file and how many contain existing information. For existing contacts, we will show the detail and you will be presented with different options on what to do with these contacts. You could for example decide to not import existing contacts or update existing contacts onlywith the new information from the Excel file.
When ready, click on "Finish" at the bottom. These contacts will now be on your invitation list.
Add invitees (HubSpot)
By clicking on the "+" sign on the right-hand side of your invitation list, choose "Import HubSpot list":
When you choose this option, you will get a new screen where you will need to do the following:
CRM list: Choose your own HubSpot list.
Ticket holder: Determine if you would like to link these contacts to a specific InviteDesk ticket holder or HubSpot ticket holder.
When you have completed all the steps, the contacts will be added to your invitation list.
Tip: This process will run in the background and you will receive a notification by mail if the process has been completed.
Add invitees (Marketo)
By clicking on the "+" sign on the right-hand side of your invitation list, choose "Import Marketo list":
When you choose this option, you will get a new screen where you will need to do the following:
CRM list: Choose your own Marketo list.
Ticket holder: Determine if you would like to link these contacts to a specific InviteDesk ticket holder or leave it as "Unallocated".
When you have completed all the steps, the contacts will be added to your invitation list.
Tip: This process will run in the background and you will receive a notification by mail if the process has been completed.
Export invitation list
Click on the following symbol on the right-hand side when you are on the tab of the invitation list:

You will see the following:
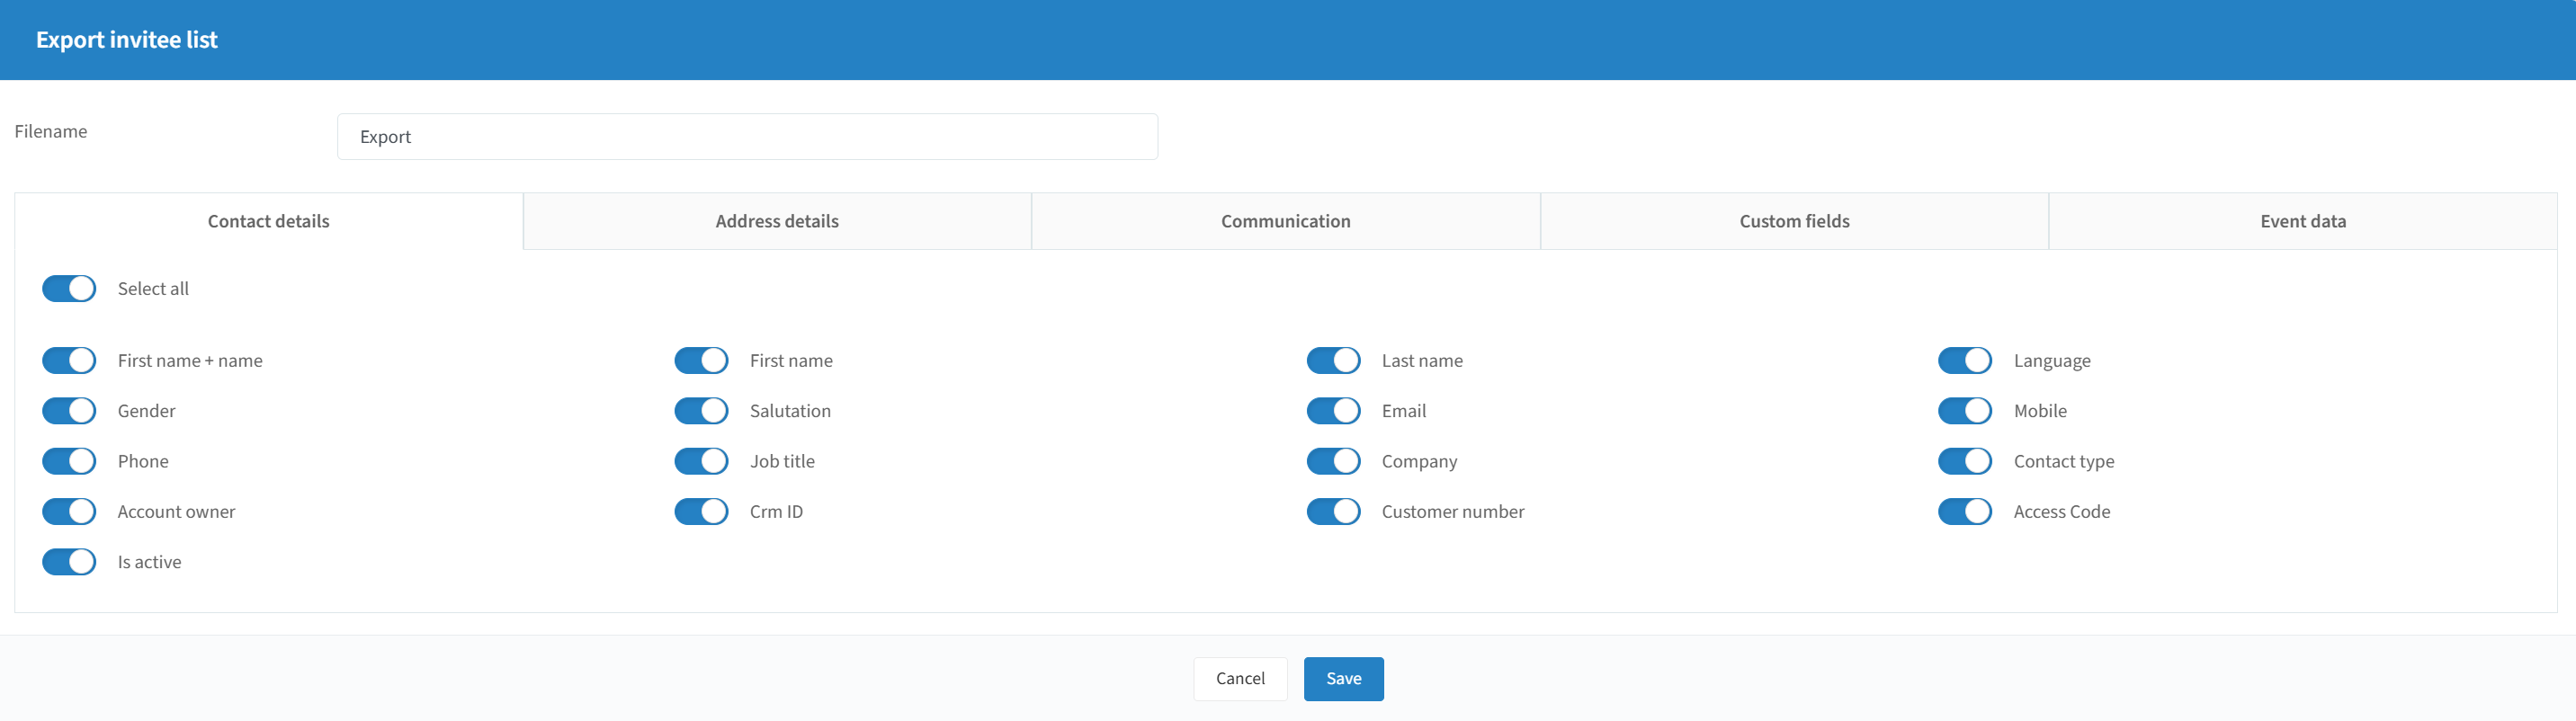
Choose the data you want, by navigating the several tabs, and click on "Save" to generate your Excel file. This file will automatically be saved in the File center.